 Dedicated FREE FOREX VPS
 Free FOREX Virtual Private Server
 MT4 Demo Contest, Get $500
 Sign Up for an Account, Claim 60% Deposit Bonus
 Free MT4/MT5 VPS 2024
 Send E-mail and Get Free Merchandise
 $1K Refer a Friend Bonus for Pepperstone Pro clients
 Maximize Your Earnings with 100% Deposit bonus
 Trade to Win, $5,000 Monthly Demo Contest
 Claim 30% + 15% Deposit Bonus from LiteFinance
Boost your trading accuracy by utilizing the Shark pattern. This pattern is claimed to have an accuracy of around 70% and offers a high-risk/reward ratio.
If you're a trader who uses chart patterns, you might know about the Shark pattern. It's one of the harmonic patterns introduced by Scott Carney in 2011.
The shark pattern is a harmonic trading formation with the structure O, X, A, B, and C to spot potential trading opportunities in the market. This pattern is relatively new compared to other patterns like Gartley, Bat, Butterfly, and Crab.
What makes the shark pattern unique is its distinctive shape, often referred to as an extreme harmonic impulse wave. It tests the levels of support and resistance within the range of 0.886 to 1.13 relative to the length of O-X. This shape sets it apart from M and W-type patterns.
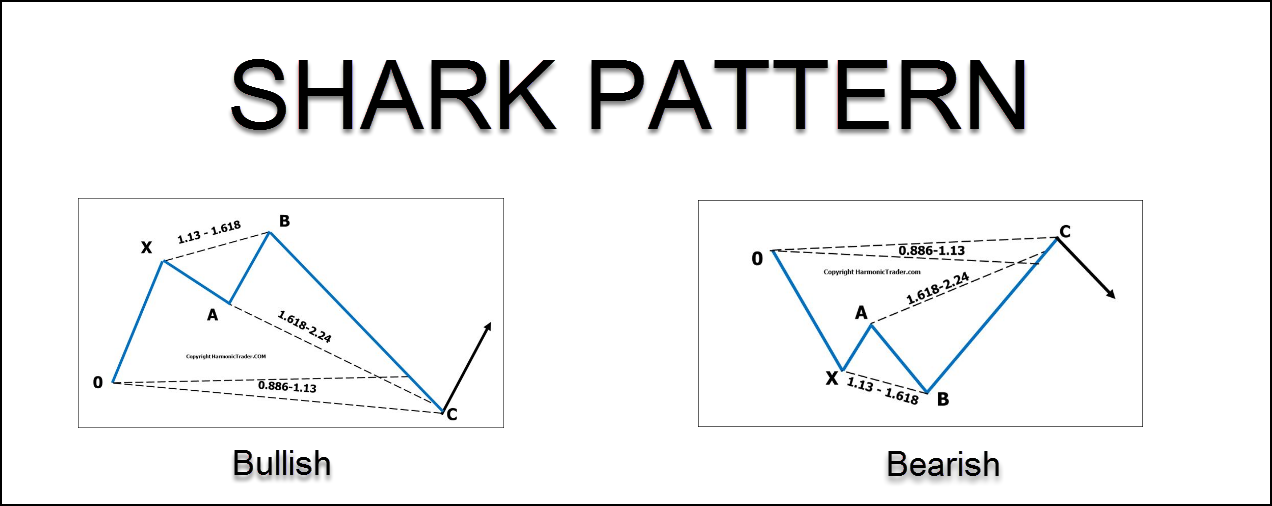
The shark pattern comprises 5 swing points and 4 legs, marked as O, X, A, B, and C, each with specific lengths. When this pattern is valid, traders can enter the market in the C point.
Similar to other harmonic patterns, the shark pattern relies on specific Fibonacci ratios during its formation. In this case, it stands out because it involves the 88.6% retracement and the 113% extension.
Furthermore, traders believe that the shark pattern serves as a leading price indicator before significant counter-trend price movements.
How to Identify Shark Patterns?
Identifying the Shark pattern is quite simple. You just need to pay attention to how the market moves in five key swings, labeled O, X, A, B, and C.
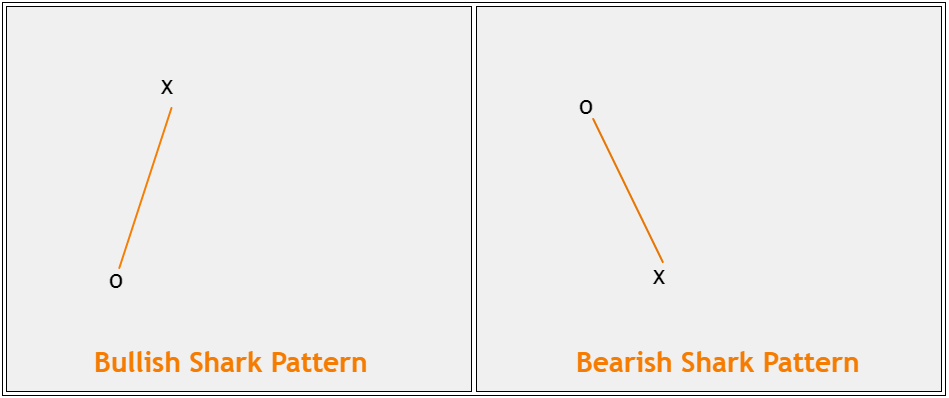
- The Shark pattern starts with the O-X move, which follows the current trend direction. If the trend is going up, the o-x move goes up, creating a higher high. Conversely, if the trend is down, the o-x move goes down, forming a lower low.
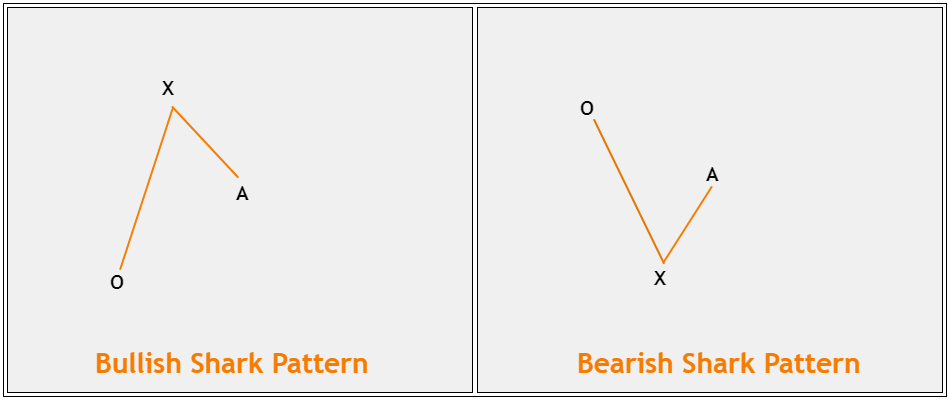
- Next, the price corrects itself and forms point A. Point A can be anywhere between O and X, but it must not go beyond O.
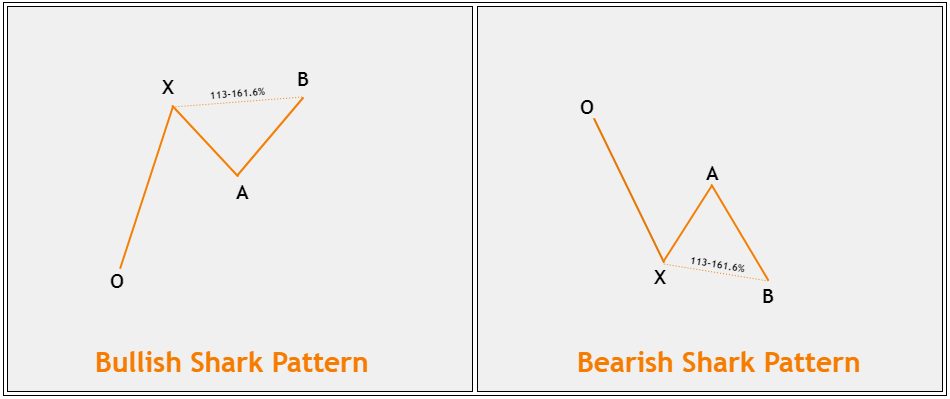
- After that, the price re-enters the main trend and passes point X. The AB leg's length should be around 113% to 161.8% of the XA leg's length.
- The price then corrects again to form point C, which typically ranges from 88.6% to 113% of the ox leg's length. The B-C leg is usually about 161.8% to 224% of the AB leg's length.
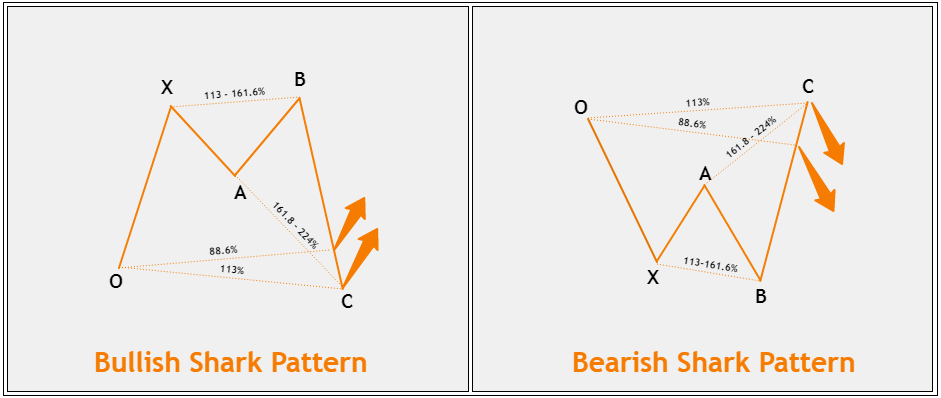
When the price successfully reaches point C, you have a valid Shark pattern. Point C is your optimal entry point, often referred to as the potential reversal zone (PRZ).
You can place your stop loss either below or above the PRZ. As for your profit target, the safest point is typically around 50% to 61.8% of BC.
Mind This Rule
The formation of a Shark pattern, whether it's a bullish Shark or a bearish Shark, doesn't necessarily change the existing price trend. Therefore, you should consider the broader price context.
When a bullish Shark forms, you'll see the price breaking through point X and creating a higher high with leg AB. After the AB leg forms, the price often experiences a significant downward move.
This condition is also applicable to the bearish shark pattern.
Steps to Trade Shark Patterns
Trading the Shark pattern effectively is relatively straightforward. You can do it in 4 simple steps:
- Determine your position. When you're looking to buy an asset, keep an eye out for a bullish Shark pattern. As for the sell setup, you're on the lookout for a bearish Shark pattern
- Simply wait for the Shark pattern formation to complete before opening a position. All you need to do is wait for point C to finish up.
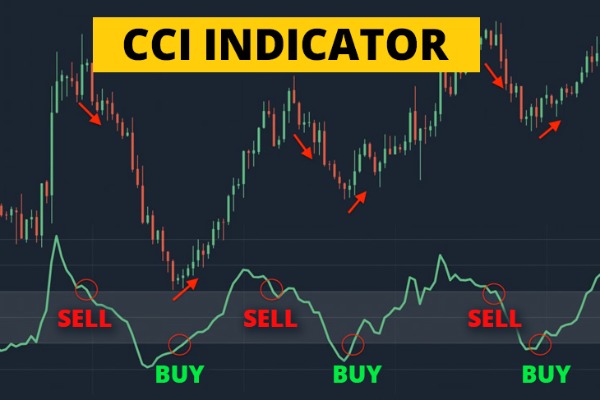
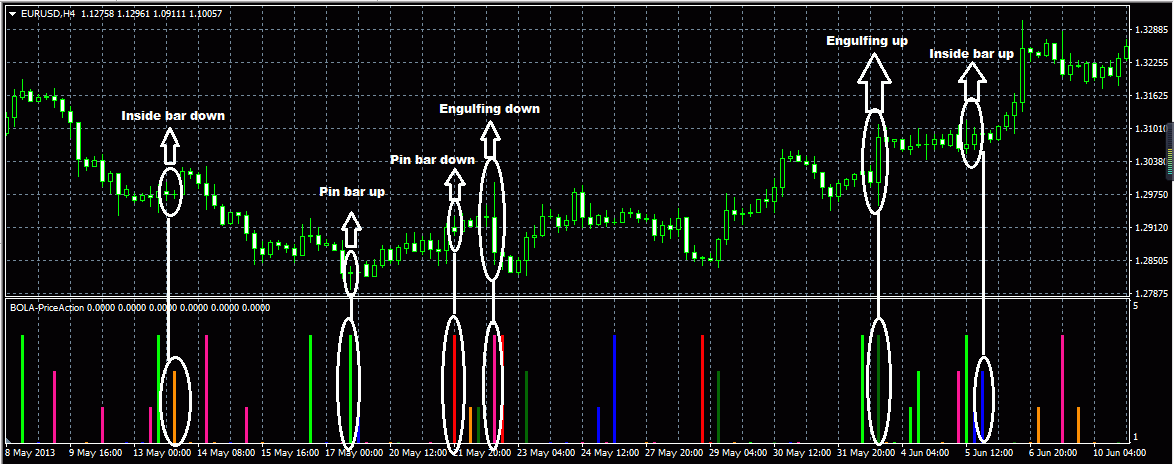
- To confirm your entry, you can use candlestick patterns like an engulfing pattern or a long pin bar. Another option is to use a combination of indicators, such as RSI, MACD, or stochastic.
- For your safety net, set your stop loss and take profit. The stop loss could be set just around the most recent low or high, while take profit level is aimed at the 50% or 61.8% retracement levels from the BC leg, point X, or point B.
Case Study
To help you understand trading Shark patterns better, let's take a closer look at these two scenarios.
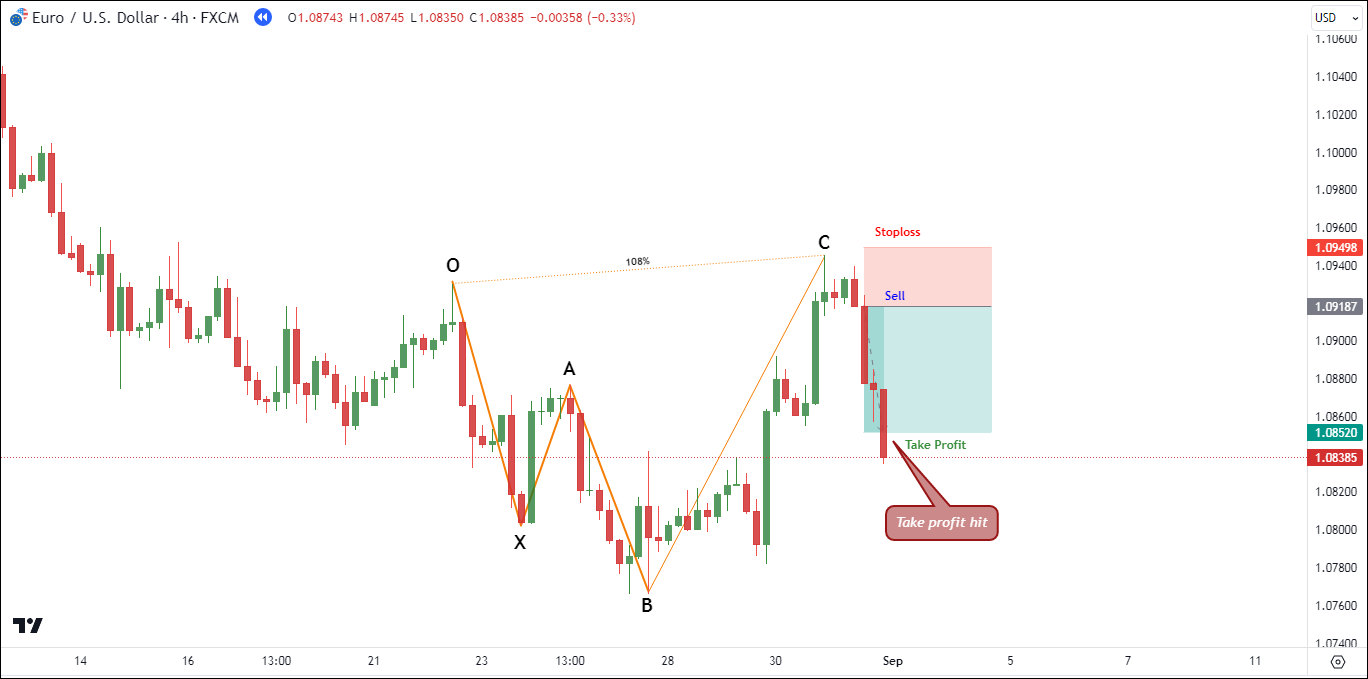
#1 Sell EUR/USD
In the H4 EUR/USD chart below, notice how the price forms a lower low, which we'll refer to as the OX leg. It's important to note that there's no specific limit to how long this OX impulse can be.
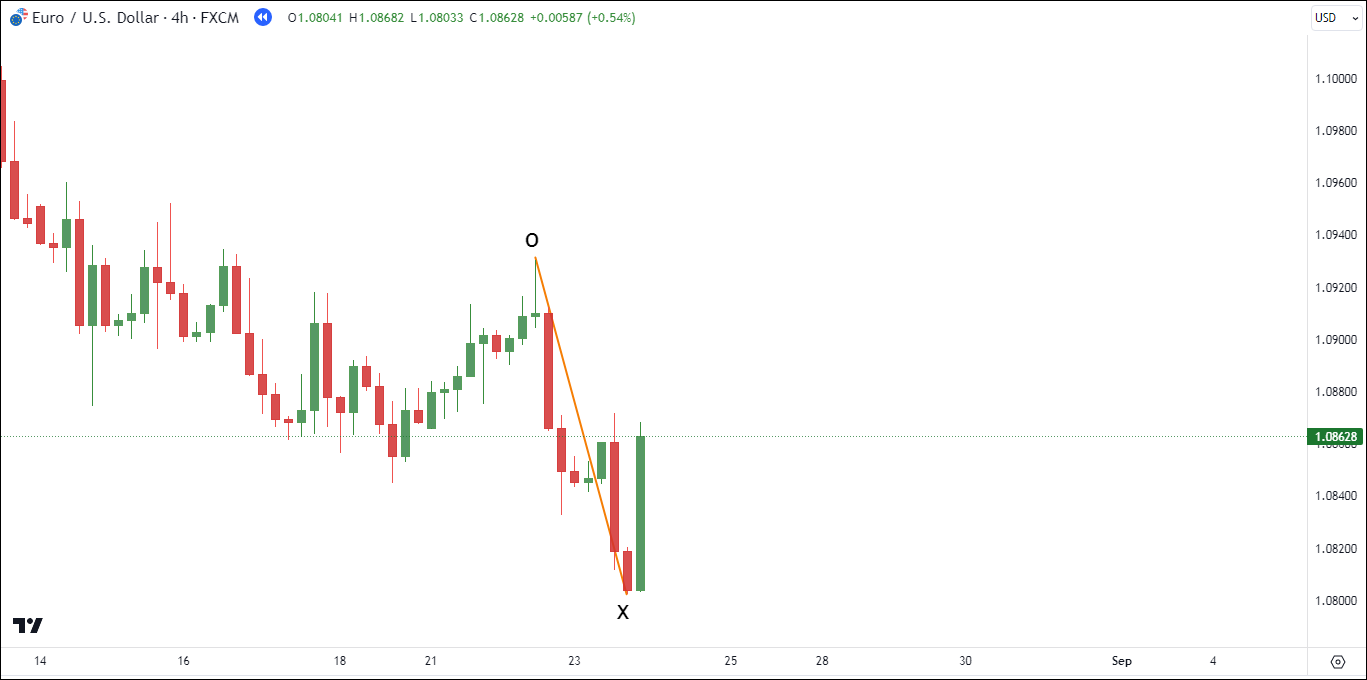
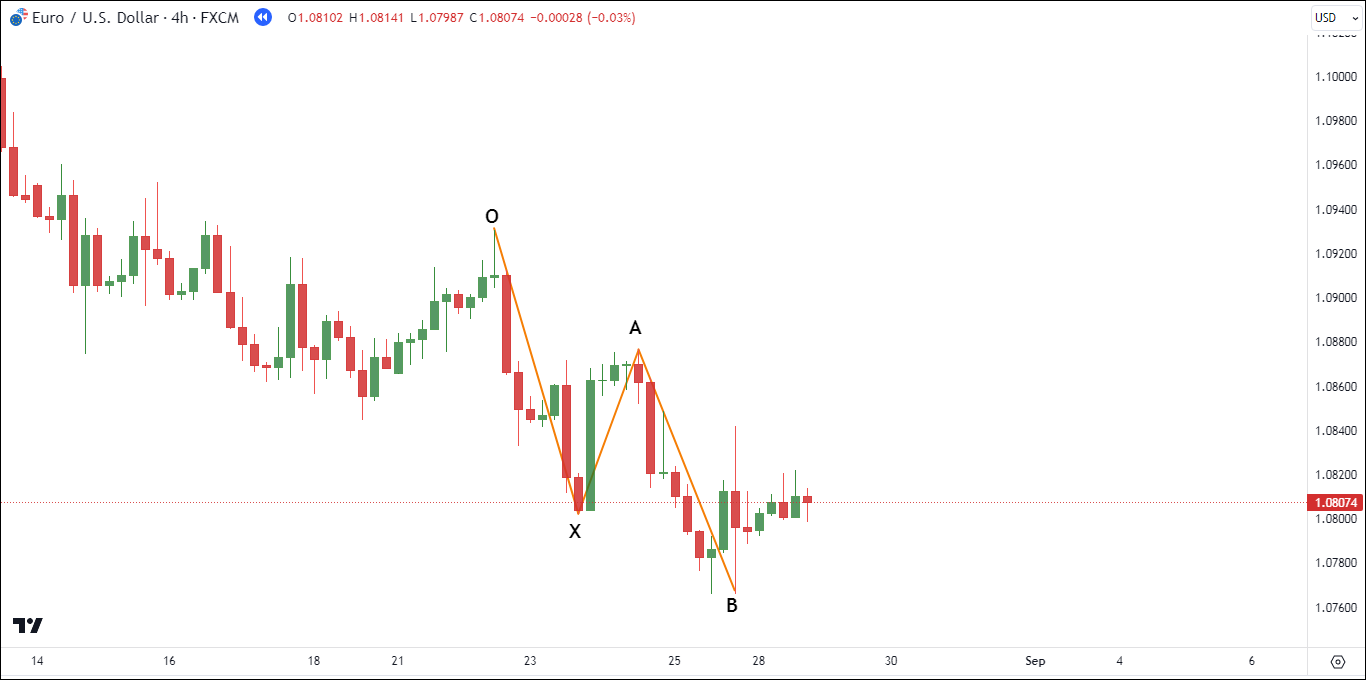
Next, the price undergoes a correction, creating the XA leg. In this particular case, the correction at point A is approximately 50% of the length of the OX leg.

Following that, the price resumes its downward movement, forming another lower low at point B. Point B is roughly 145% away from the length of the XA leg. This indicates that the extension length still meets the required criteria, and all we need now is the formation of point C.
Interestingly, the price strengthens quite rapidly, reaching slightly higher than point O. To be precise, it's around 108% of the length of the OX leg. Consequently, point C becomes valid, and we decide to enter a sell position.

Our sell position is initiated for 1.09187, and we place a stop loss at 1.09498 (31.1 pips). For our take profit, we set it at 1.08520 (66.7 pips). This particular take-profit level corresponds to approximately 50% of the BC leg. The risk-reward ratio for this sell setup stands at around 1:2.14.
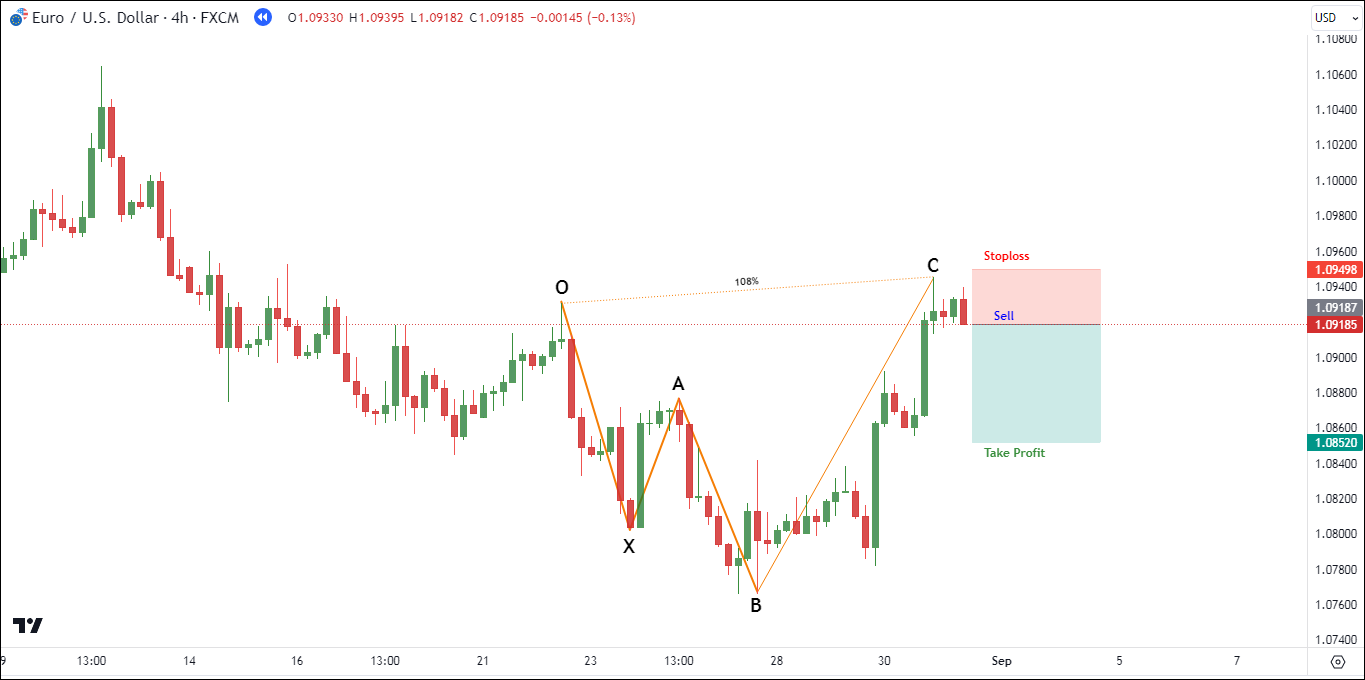
After entering the sell position, the price continues to decline until it reaches the take profit level at 1.08520. This setup successfully yields a profit of 66.7 pips, equivalent to roughly 2.14 times the initial risk (2.14R).
#2 Buy GBP/USD
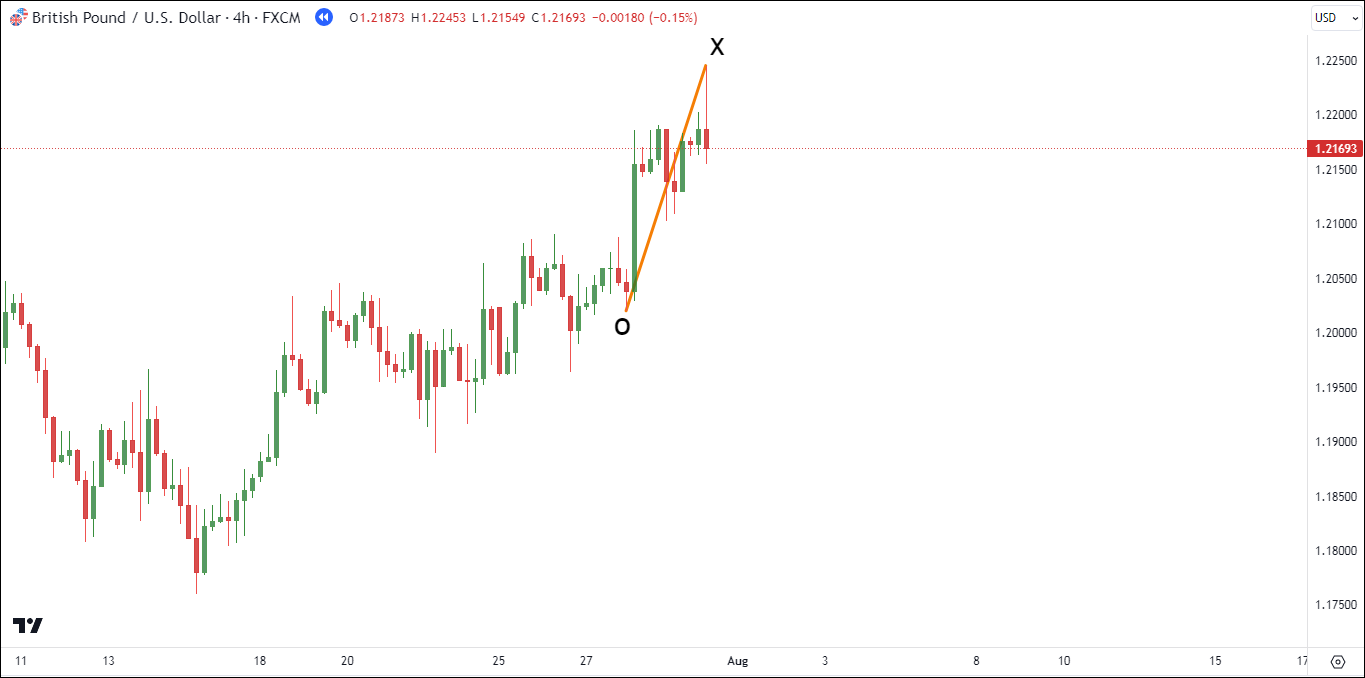
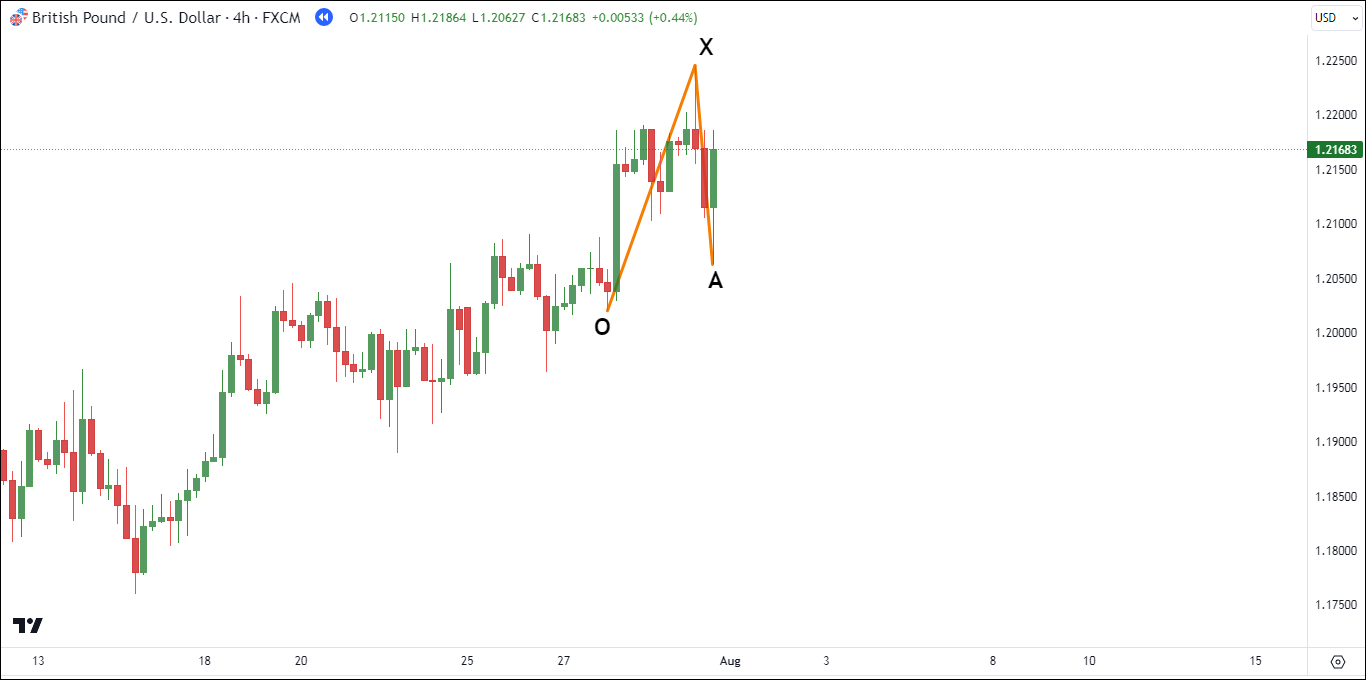
In the H4 chart of GBP/USD below, you can observe the price forming a higher high. We've marked this point as O and X.
Following the formation of point X, the price experiences a downward correction, reaching approximately 81.1% of the length of the OX leg. This correction is identified as point A.
The price then resumes its upward movement, creating yet another higher high. We've labeled this as point B, which is roughly 126% away from the XA leg. It signifies that the bullish shark pattern only needs point C to validate.
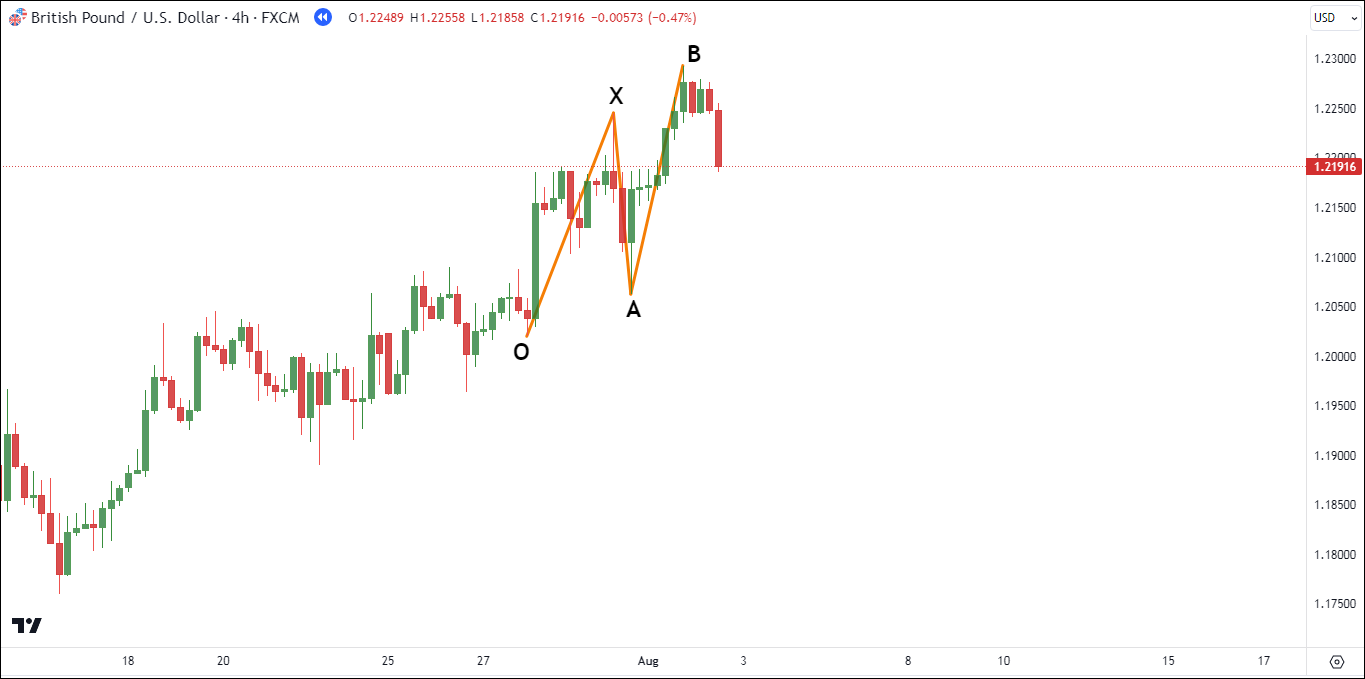
The price once again falls, reaching about 107.6% of the length of the OX leg. Consequently, point C becomes valid since it falls within the range of 88.6% to 113% of the OX leg's length.
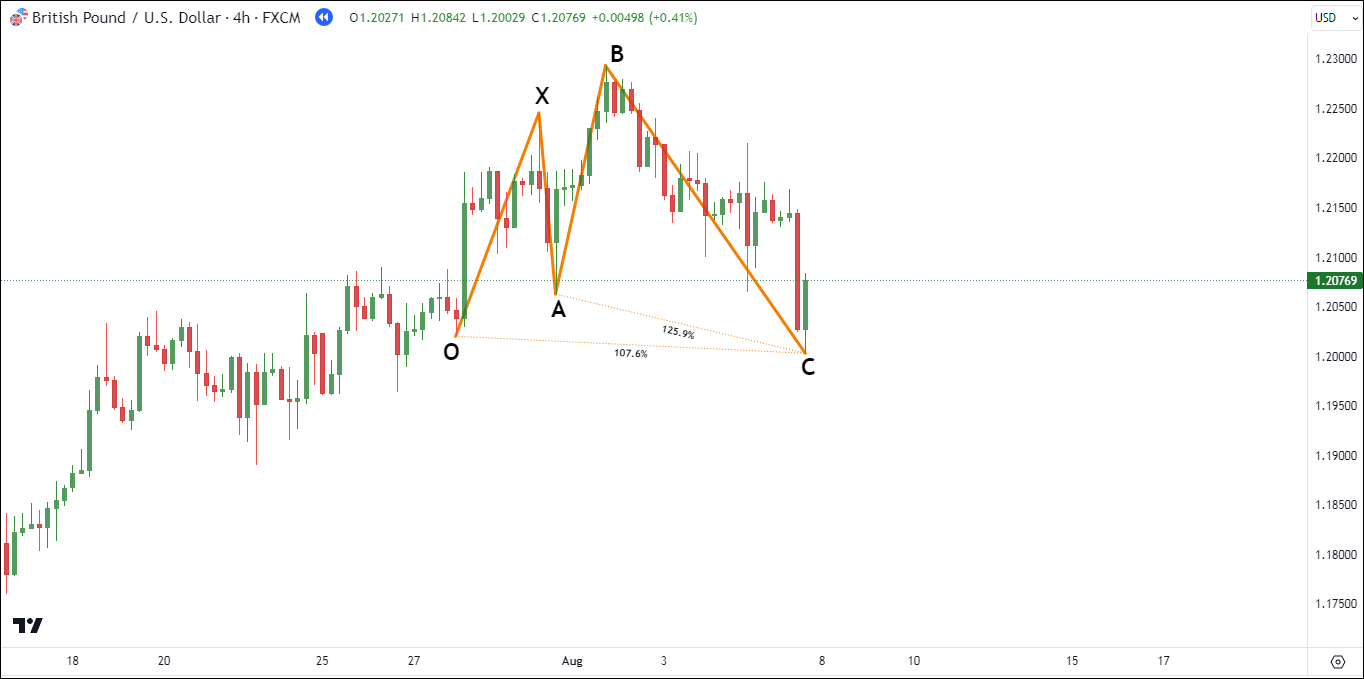
With point C now validated, we enter a buy position when the H4 candlestick closes. Our buy position is entered at 1.20718, and we place a stop loss at 1.19971 (74.7 pips).
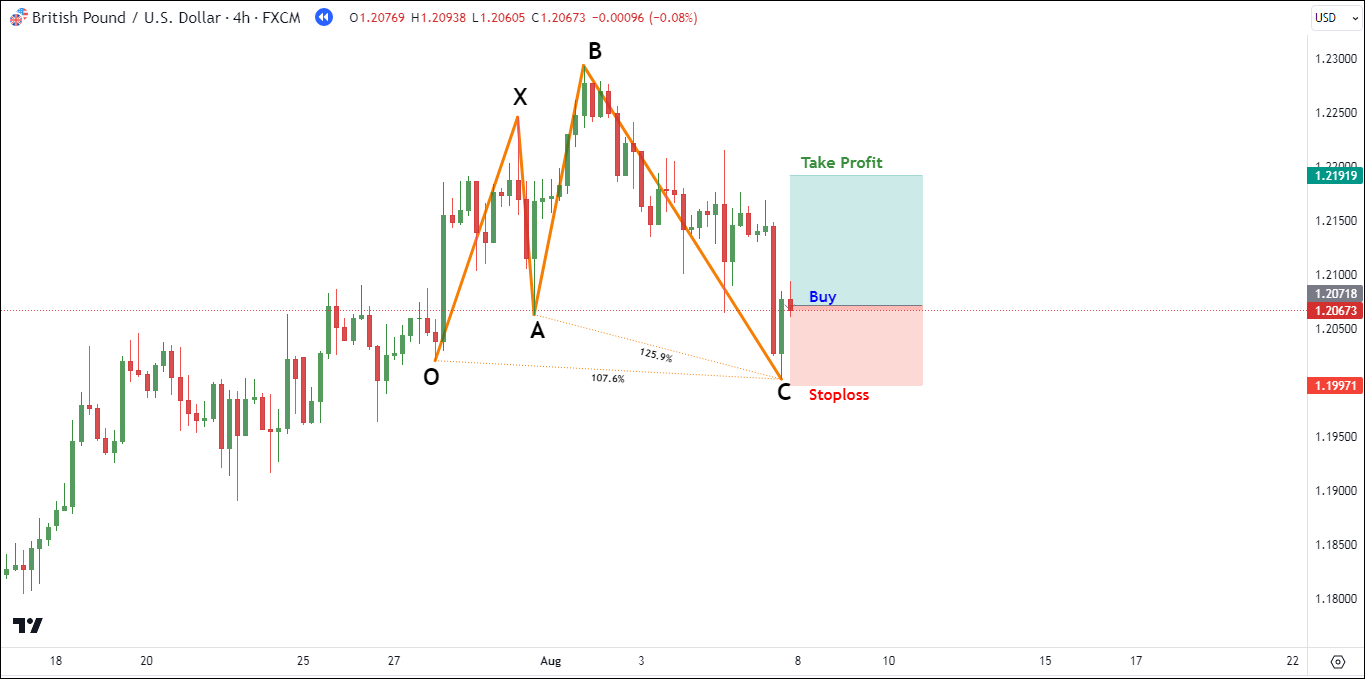
For the take profit, we set it about 61.8% of the length of the BC leg at 1.21919 (120.1 pips). This setup offers a risk-reward ratio of 1:1.61.
After entering the buy position, the price continues to rise until it reaches the take profit level at 1.21919. This setup proved to be successful, resulting in a profit of 120.1 pips, which is approximately 1.61 times the initial risk (1.61R).

Shark Pattern FAQ
- What Is The Success Rate of Shark Pattern?
The success rate of the Shark pattern, like many technical analysis patterns in trading, can vary. The claimed accuracy of the Shark pattern is often measured to be around 70% or higher. However, it's important to note that the actual success rate can depend on several factors like market conditions, time frame, and trading instrument. - What Is The Best Time Frame to Trade Shark Pattern?
The bullish Shark pattern is applicable across various time frames, but it is advisable to focus on trading this harmonic chart pattern on H1 or higher. Choose the time frame that aligns with your trading goals and strategy, and consider backtesting for validation. - How to Draw The Shark Pattern?
Drawing the harmonic shark pattern manually is straightforward and can be done using basic drawing tools found on popular trading platforms such as MT4, MT5, TradingView, and others. Alternatively, you can simplify the process by utilizing a custom-built shark harmonic indicator, which automatically plots the pattern lines according to the correct Fibonacci ratios. If you happen to use MT4 or MT5, you can obtain and install such an indicator from the MQL5 website.
Conclusion
The Shark pattern stands out as a profitable harmonic trading pattern. It serves as a reversal indicator where you typically enter at point C.
When plotting the Shark pattern, it's crucial to ensure that the C point is positioned 88.6%-113% from the O-X leg. Always bear in mind that like any trading strategy, the Shark pattern should be employed in conjunction with robust risk management practices to mitigate potential losses.
Before you start using this pattern in your trading, we suggest doing a backtest or forward test first. This helps you get a grasp of the crucial details involved.


10 Comments
Joy
Sep 13 2023
I use chart patterns for my trading strategies, like double tops, double bottoms, and head and shoulders. These are the patterns I'm most comfortable with and have been using for a while.
From this article, I came across a new harmonic pattern called the Shark pattern. Until then, I had only known about the more common harmonic patterns like Gartley, Bat, Crab, and Butterfly.
I'm curious to know what makes the Shark pattern unique and how it compares to the others, such as Gartley, Crab, Bat, and Butterfly. I would really appreciate it if you could shed some light on this. Thanks a lot in advance!
David Tristan
Sep 13 2023
The Shark pattern is indeed one of the lesser-known harmonic patterns in technical analysis, but it can be a valuable addition to your trading arsenal. Like other harmonic patterns, the Shark pattern is based on specific Fibonacci retracement and extension levels.
The Shark pattern is unique in its use of the 0.886 and 1.13 Fibonacci ratios for the XA and BC legs, respectively. It is used to identify potential trend reversals and can provide trading opportunities when other harmonic patterns may not align.
Here's a brief overview of the Shark pattern and how it compares to some of the more common harmonic patterns like Gartley, Crab, Bat, and Butterfly:
Brandon E
Sep 13 2023
In the explanation, we talked about confirming entry points using different methods. One of these methods involved using candlestick patterns like engulfing or pin bars to make sure our trading decisions were on the right track.
However, I want to mention that I'm not very familiar with candlestick patterns because I've mostly relied on indicators for my trading. So far, indicators have been my main tools for understanding market conditions and making smart choices.
With that in mind, I'm curious to explore how we can use indicators to confirm the Shark pattern effectively. For example, can we use the stochastic indicator alongside the Shark pattern to improve our trading decisions? I'm eager to learn more about this aspect of trading, and any insights you can offer would be greatly appreciated. Thanks
David Tristan
Sep 13 2023
Certainly, you can use technical indicators like the stochastic oscillator alongside the Shark pattern to improve your trading decisions. Here's how you can incorporate indicators into your analysis when trading the Shark pattern:
- The stochastic oscillator is a versatile momentum indicator that traders often use to gauge potential entry or exit points when trading harmonic patterns such as the Shark.
- The primary purpose of the stochastic oscillator is to identify overbought and oversold conditions within the market. This can be especially useful when determining the timing of your trades.
- When you identify a potential Shark pattern forming, pay close attention to point D, which is the critical completion point for the pattern. This point often serves as a potential entry point for your trade.
- To enhance confidence in your trade setup, consider looking for confluence or agreement between the Shark pattern and the stochastic indicator.
- For example, if the Shark pattern suggests a bullish reversal, indicating that point D is a potential buy point, you can further validate this decision by checking the stochastic oscillator. If the stochastic is in oversold territory at this time, it suggests that the market might be poised for upward momentum. This alignment between the Shark pattern and the stochastic can provide confirmation for a long trade.
- Conversely, if the Shark pattern indicates a bearish reversal (point D is a potential sell point), and the stochastic oscillator is in overbought territory, it can provide additional confirmation for a short trade.
- Another advanced technique for using the stochastic oscillator in conjunction with the Shark pattern is to look for bullish or bearish divergence.
- Bullish divergence occurs when the Shark pattern suggests a bullish reversal (point C is a buy point), but the stochastic oscillator shows higher lows. This implies that the momentum is building to the upside, potentially strengthening the case for a long trade.
- Bearish divergence, on the other hand, occurs when the Shark pattern signals a bearish reversal (point C is a selling point), but the stochastic oscillator shows lower highs. This suggests that downward momentum is increasing, providing additional support for a short trade.
- The divergence between the Shark pattern and the stochastic oscillator can be a potent confirmation signal because it indicates a potential shift in market sentiment that aligns with the pattern's intended direction.
Killua
Sep 13 2023
Initially, I didn't find it particularly intriguing. However, when I noticed that the win rate was above 70%, it piqued my interest. It's quite remarkable, especially when used with a 1:2 risk-reward ratio.
Now, I'd like to test it out on a demo account first to see if the strategy can indeed achieve a win rate of around 70%. The thing is, I'm still quite new to testing, whether it's backtesting or forward testing. I'd really appreciate some guidance on how to go about backtesting and forward-testing this strategy.
David Tristan
Sep 13 2023
Certainly, backtesting and forward testing are crucial steps to validate and refine a trading strategy. Here's a step-by-step guide on how to approach both processes:
Backtesting involves testing your trading strategy on historical price data to assess its performance in the past. Here's how you can do it:
- Data Collection: Obtain historical price data for the financial instrument you intend to trade. You can usually find this data from your trading platform or third-party sources.
- Define the Rules: Clearly define the rules of your trading strategy, including entry and exit conditions, risk management rules, and trade management rules.
- Simulate Trades: Manually or using backtesting software, simulate trades according to your strategy's rules on the historical data. - Record each trade's entry and exit points, stop-loss, take-profit levels, and the result (win or loss).
- Analyze Results: After running multiple simulations over a significant dataset (ideally several years of historical data), analyze the results. Calculate important metrics like win rate, average gain, average loss, and the overall profitability of the strategy.
- Refine and Optimize: If the backtest results meet your expectations, great! If not, consider refining your strategy by adjusting parameters, rules, or risk management techniques and then re-run the backtest. This iterative process helps fine-tune your strategy.
Forward testing involves testing your strategy in real-time, but on a demo account or with small live trades. It helps validate the strategy's performance in current market conditions. Here's how to proceed:
- Demo Trading: Open a demo trading account with your chosen broker or trading platform. This allows you to trade with virtual money while experiencing real market conditions.
- Implement Your Strategy: Trade your strategy on the demo account exactly as you would in a live trading environment. Follow the same entry and exit rules, risk management, and trade management techniques.
- Track and Analyze: Keep a detailed journal of every trade you make during the forward testing period. Record the entry and exit points, reasons for the trade, and whether it was a win or loss.
- Assess Performance: After a reasonable period of forward testing (several weeks to several months), assess the performance of your strategy. Compare the results to your backtest and ensure they align closely.
- Adjust if Necessary: If the strategy is performing as expected, you can consider moving to live trading with a small amount of capital. If it's not meeting your goals, make necessary adjustments and continue forward testing.
Nolan
Sep 13 2023
After reading this, I tried applying it to my real trading account. Even though I had a small capital, the consecutive losses had a significant impact on my trading. Now, I've come back to read it again to see if I missed something or didn't fully understand it.
One of the main reasons for my losses is that I've encountered a lot of false signals. When I enter trades based on the pattern, the price doesn't reach the take profit level as expected; instead, it reverses and hits the stop loss. This hasn't just happened once or twice but multiple times. I'm eager to find out how I can avoid these false signals and improve my trading strategy.
David Tristan
Sep 13 2023
Experiencing consecutive losses due to false signals can be frustrating, but it's a common challenge in trading. Here are some strategies and tips to help you minimize false signals and improve the accuracy of your trading strategy:
Consider adding additional criteria to filter out potential false signals. You can use technical indicators like the stochastic oscillator, RSI (Relative Strength Index), or MACD (Moving Average Convergence Divergence) to confirm the validity of the Shark pattern before entering a trade. Look for confluence between these indicators and the pattern itself. For example, if you're considering a long trade based on a bullish Shark pattern, check if the stochastic oscillator is in oversold territory and showing signs of turning upward. This convergence can boost your confidence in the trade.
Analyzing multiple timeframes can provide a clearer picture of the market. If you see a Shark pattern on the 1-hour chart, for instance, check the higher timeframe (e.g., 4 hours or daily) for confirmation or divergence signals. This can help reduce the impact of short-term noise and false signals.
Implement strict risk management rules to protect your capital. This includes setting stop-loss orders at a level that aligns with your risk tolerance and trade setup. Be consistent with your position sizing to ensure that no single loss significantly impacts your account.
Avoid the temptation to chase every potential pattern you see. Wait for the most compelling setups with a strong confluence of factors, including technical indicators, and adhere to your trading plan with discipline.
After each trade, whether it's a win or a loss, review your trade setup, entry and exit points, and the reasons for the trade. This post-trade analysis can help you identify weaknesses in your strategy and refine it over time.
Overtrading can lead to more false signals and increased losses. Stick to a predefined trading schedule and avoid entering trades out of boredom or frustration.
The financial markets are dynamic, and there's always more to learn. Continuously educate yourself about different trading strategies, patterns, and market conditions. Attend webinars, read books, and consider seeking guidance from experienced traders or mentors.
Emotional reactions to consecutive losses can lead to impulsive decisions. Maintain emotional control by using a trading journal to track your emotions and stay focused on your long-term trading goals.
Beatrixx R
Sep 14 2023
After thoroughly reading this article, I decided to test it on my small trading account. I was curious to see how well this strategy would work for me.
I applied the strategy on the H1 time frame, but out of roughly 40 trades, only around 55% turned out to be profitable, while the remaining ones resulted in losses. This made me realize that there were quite a few unexpected losses.
I'm wondering what might be causing this and what I should do if I encounter a streak of consecutive losses.
David Tristan
Sep 14 2023
Experiencing a streak of consecutive losses can be challenging and frustrating, but it's a common part of trading. Let's explore some possible reasons for the unexpected losses and what you can do to manage and overcome such situations:
Market conditions can change, affecting the performance of your strategy. What worked well in one market phase may not work in another.
Consider whether the market has been trending strongly or experiencing choppy, sideways movements. Certain strategies, including harmonic patterns, may perform differently in different market environments.
A sample size of around 40 trades is relatively small for statistically assessing the effectiveness of a trading strategy.
It's possible to encounter streaks of losses within a small sample size, even if your strategy has a positive expectancy over the long term. As you take more trades, the win rate should converge closer to your expected rate.
Review your risk management practices. Ensure that you are adhering to strict position sizing and stop-loss placement based on your trading plan.
If the losses have had a significant impact on your account, consider reducing your position size to manage risk more conservatively.
Emotional factors can play a role in unexpected losses. It's essential to manage emotions such as fear and frustration during losing streaks.
Stick to your trading plan and don't let emotions influence your decisions. Avoid revenge trading or altering your strategy impulsively due to losses.
Analyze the trades within your losing streak to identify common factors or mistakes. Are there specific aspects of your strategy that need adjustment or refinement?
Be open to adapting your strategy based on your observations. However, avoid making hasty changes; instead, make data-driven adjustments after a thorough review.
Continue to study the markets and gather information about the assets you're trading. This can help you make more informed decisions and adapt to changing conditions.
Consider diversifying your trading approach by exploring different strategies or trading different assets. A diversified portfolio can help spread risk.
Trading can be emotionally taxing, especially during losing streaks. Seek support from trading communities, mentors, or professionals who can provide guidance and encouragement.
Remember that trading is a long-term endeavor. Even the best traders experience losing streaks.
Maintain patience and discipline, and focus on your overall trading performance over a more extended period.
Keep a trading journal to record your trades, thoughts, and emotions. This journal can help you track your progress and identify areas for improvement.