 Unlock Max $5,000 Deposit Bonus after Opening an Account
 Dedicated FREE FOREX VPS
 Free FOREX Virtual Private Server
 MT4 Demo Contest, Get $500
 Sign Up for an Account, Claim 60% Deposit Bonus
 Free MT4/MT5 VPS 2024
 Send E-mail and Get Free Merchandise
 $1K Refer a Friend Bonus for Pepperstone Pro clients
 Maximize Your Earnings with 100% Deposit bonus
 Trade to Win, $5,000 Monthly Demo Contest
OANDA account opening is fully online and very straightforward. Read the following guide to start your journey in OANDA.
If you are planning to start online trading, you'll need to open a trading account. You can set up an account at many brokerage firms depending on your needs. The broker basically acts as the middleman that gives you access to the market. Once you've completed the trade, you can withdraw your account balance at any time you want.
However, opening a brokerage account for the first time can be quite confusing. Each broker has a different set of rules to follow, so it's important to learn about them beforehand and make sure that you have prepared all the requirements in order to register easily. In this article, we will show you how to open an account in one of the most well-known brokers in the world, OANDA. But before that, here's a quick review of the broker to get you started.
Contents
Introduction to OANDA
OANDA is a US-based brokerage firm that was established in 1996. It was co-founded by computer scientist Dr. Michael Stumm and an economist Dr. Richard Olsen, who believed that technology and the internet would open up huge opportunities for both currency data and trading. Today, OANDA has grown into a giant company that offers plenty of financial products in various regions worldwide, including the Middle East, North America, Central America, Europe, South America, Oceania, Antarctica, the Caribbean, and Asia.
OANDA is an ideal broker for any type of trader, including beginners. It offers some of the tightest spreads in the markets, no minimum deposits, and low trade sizes. The broker also supports many trading techniques such as scalping, hedging, and algorithmic trading. As for safety, OANDA is under the regulation of several top-tier authorities, such as ASIC of Australia, MAS of Singapore, FCA of the UK, and more. This simply showcases OANDA's commitment to fulfilling its responsibilities as a broker and maintaining clients' trust.
OANDA Account Opening Requirements
OANDA account opening is fully online and quite straightforward. You can just use your device to access the broker and start the registration process. However, there are several things that you need to know beforehand.
First of all, OANDA only accepts clients that are over 18 years old. This is important because forex trading is certainly not free of risk, so you need to be fully aware of the potential damage before you enter the market.
In order to verify your identity, you'll be required to provide some documents as a form of compliance with anti-money laundering regulations. This step is particularly necessary if you want to open a Premium or Premium Core account in OANDA and deposit or withdraw more than $9,000. There are two types of documents that you'll need to provide in full account verification, namely:
Proof of Identity
To verify your identity and nationality, you'll need to upload one of the following documents:
- Valid Passport
- Valid Driver's License
- Valid Photo ID
Proof of Residence
To confirm your address, you must provide one of the following documents:
- Bank or Credit Card Statement
- Driver's License
- Photo ID
- Court Papers or Summons
- NHS, Council Tax, or Tax Document
- Utility Bills (e.g. gas, electricity, water)
- TV License
- Landline Telephone or Internet Invoice (mobile phone bills are not accepted)
If you are a new client, you can easily upload the documents during the registration process in OANDA, which we will explain shortly. But if you are an existing client, you'll need to email the documents to [email protected] and wait for your application to be reviewed by the relevant team.
Steps to Start Trading in OANDA
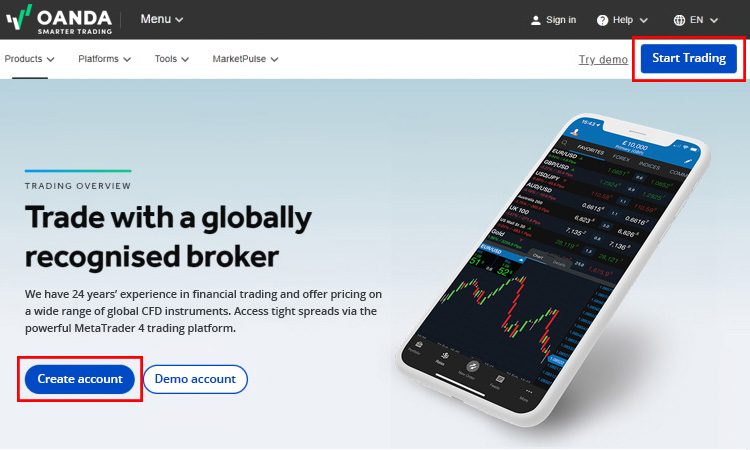
1. Head over to OANDA's official website and click "Create Account" on the main page or "Start Trading" on the top right.
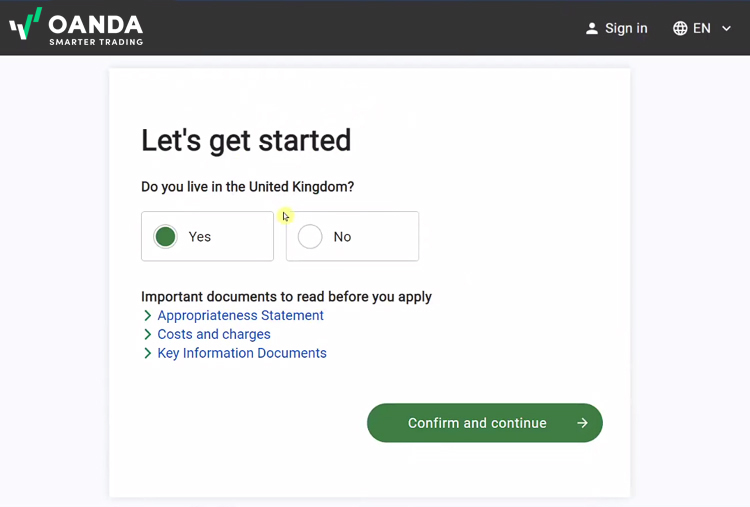
2. You will be asked if you live in the country that you logged in from. Select "Yes" or "No" depending on your situation. Read also the documents presented below it and then click "Confirm and Continue" to proceed to the next page.
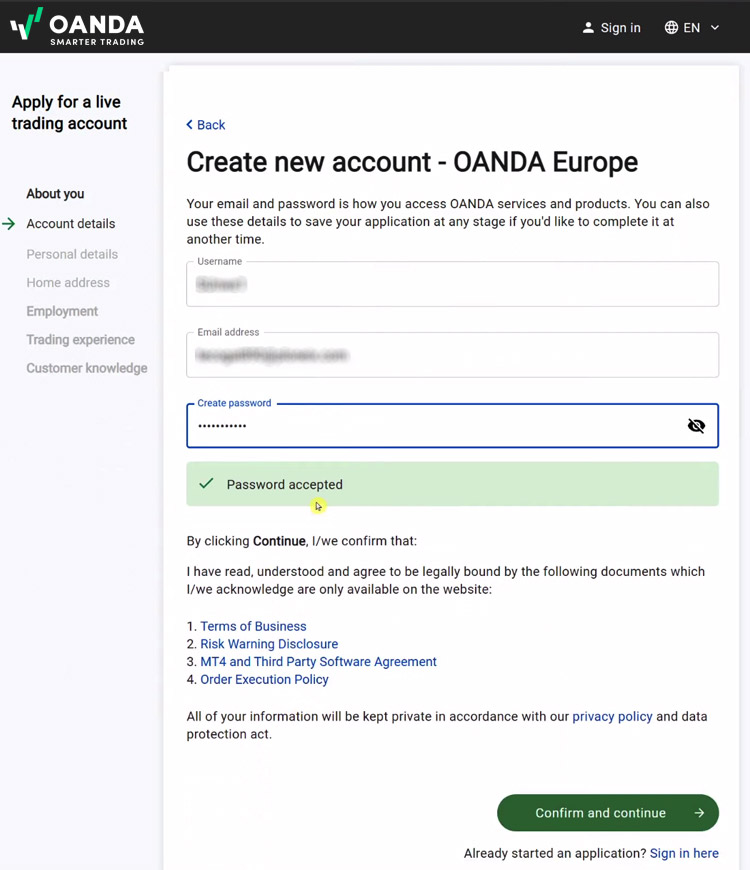
3. As a starter, you'll need to provide some basic information for your new account. Enter your username and email address, and then choose a strong password. After that, set up a security question that will help you if you want to reset your password. Once you're done, click "Confirm and Continue".
See Also:
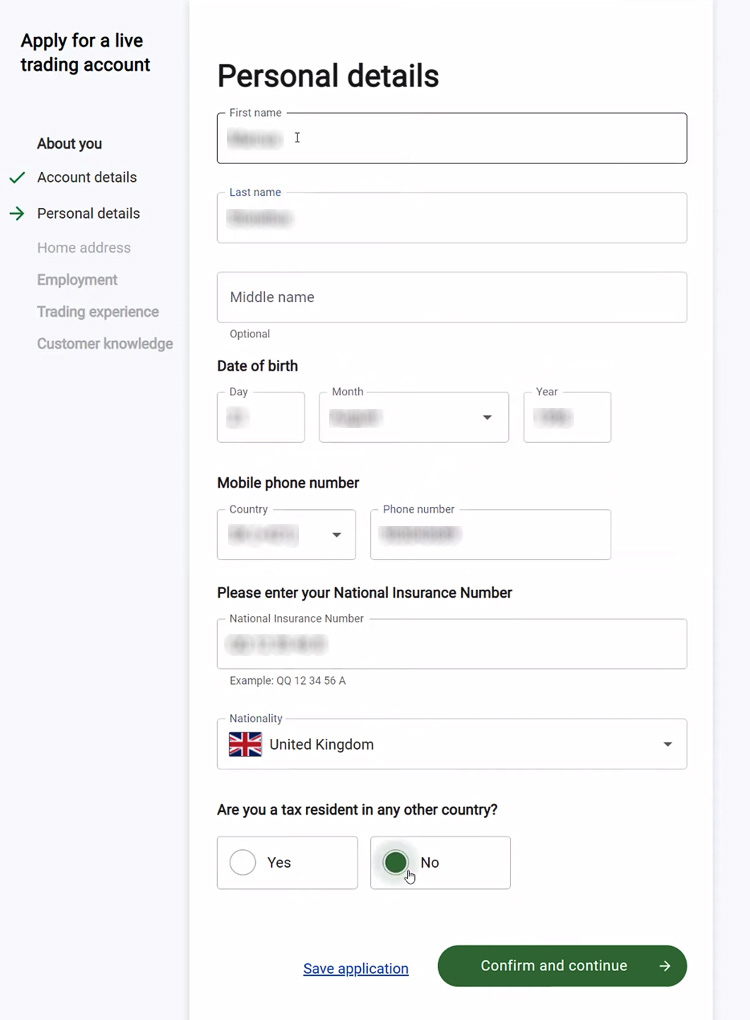
4. Fill in your personal details, such as your first and last name, date of birth, mobile phone number, and your national insurance number according to your country. Click "Confirm and Continue".
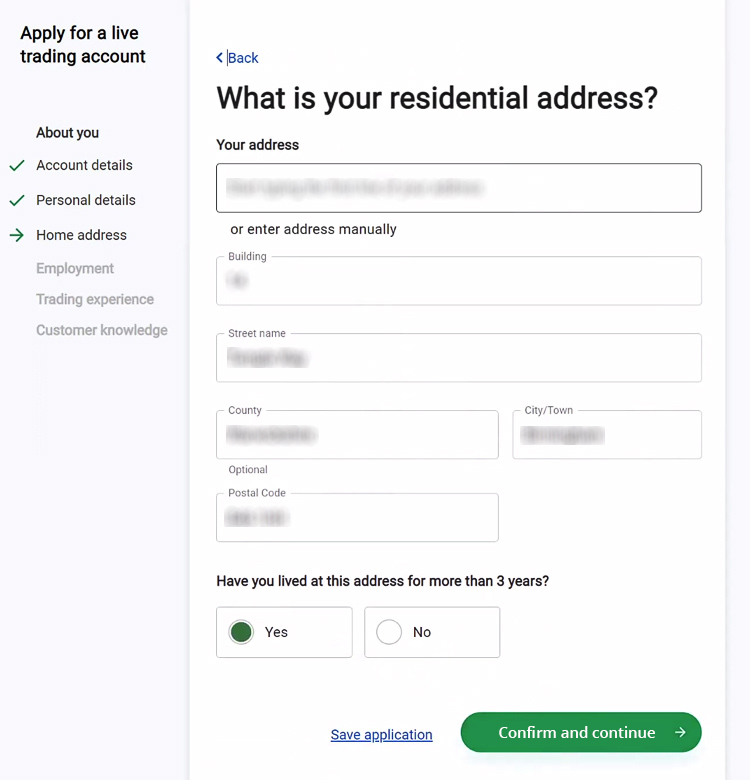
5. On the next page, enter your residential address. You can start by typing the first line of your address and finding it automatically, or you can just enter it manually. Make sure that your address is correct before moving to the next step.
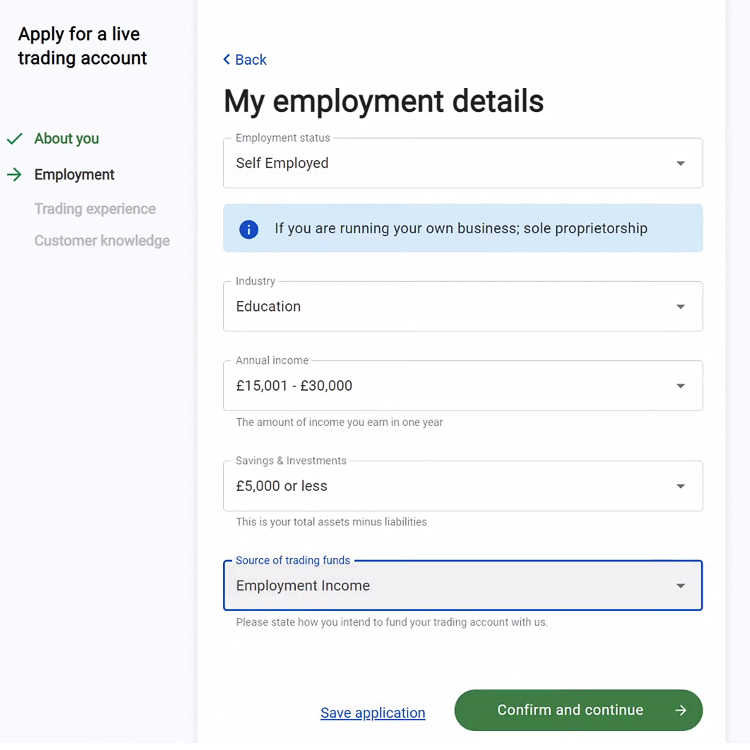
6. You'll also need to provide information about your employment details. This includes your employment status or job title, your annual income, the amount of your savings and investments, and the source of your trading funds. Once you're done, click "Continue".
7. Provide information regarding your trading experience. This includes the number of CFD trades, forex trades, and other trades that you've executed throughout your trading career. Keep in mind that there's no need to obscure your experience here. The information provided will help the broker to suggest the best trading conditions based on your expertise.

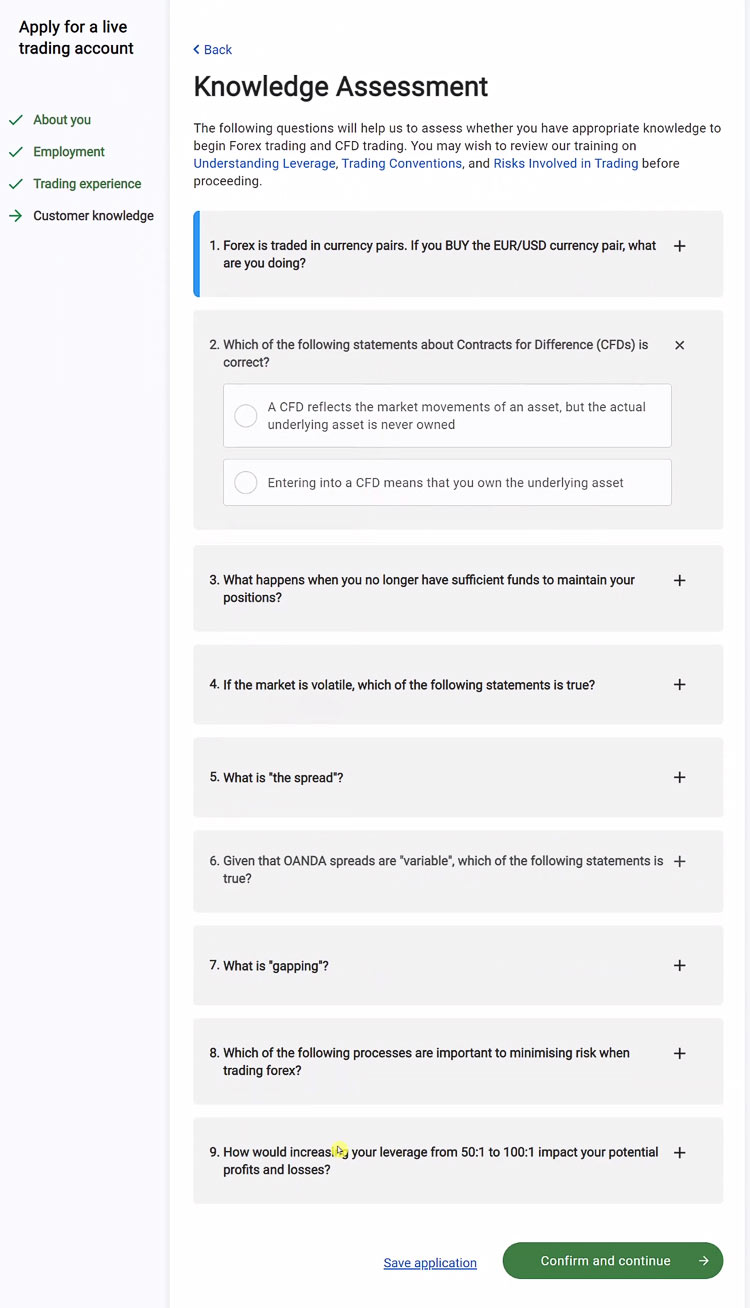
8. On the next page, there is a small quiz consisting of 9 questions related to trading. This is to ensure that you have the appropriate knowledge to start trading. Don't worry too much though because the questions are mostly considered entry-level, so any person with a basic knowledge of forex trading should be able to answer them.
See Also:
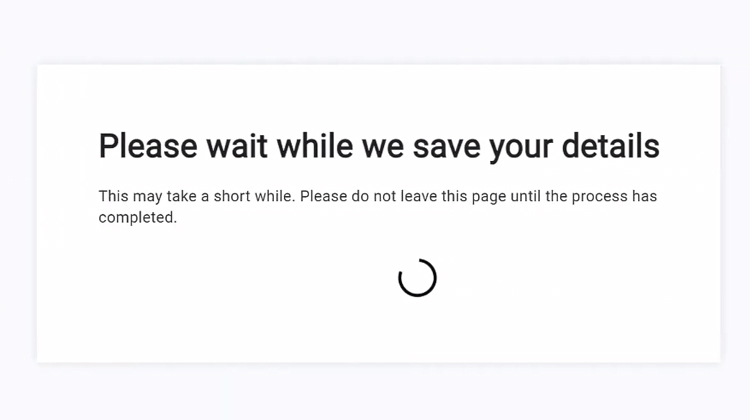
9. Wait for the broker to review some of your details. This usually takes only a few seconds.
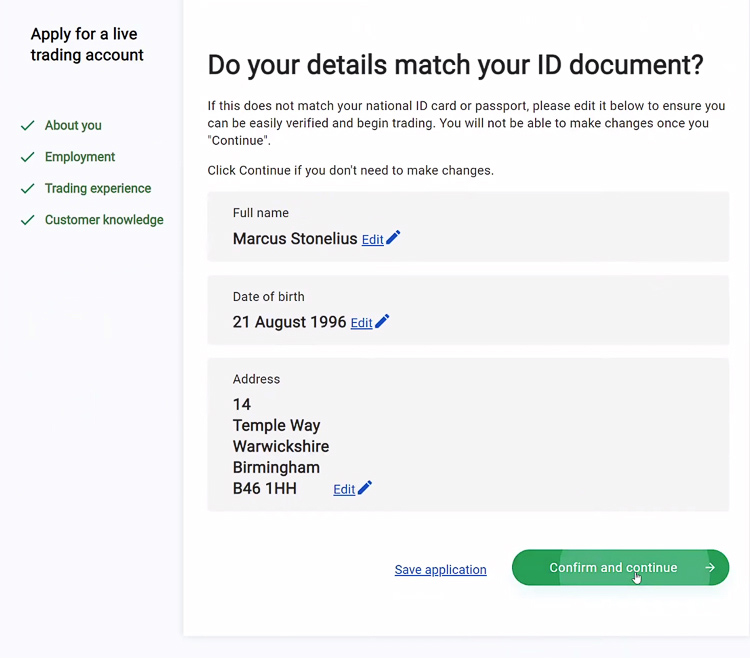
10. You will be asked to check your personal details once more. Make sure that the data you provided are correct and match your National ID Card or Passport. Click "Confirm and Continue" once you're done.
11. Provide the image or document needed for your Proof of Identity. You can choose between your Passport, Driver's License, or Photo ID. Once you upload it, click "Confirm and Continue".

12. Provide the image or document needed for your Proof of Residence. This can either be a Bank or Credit Card Statement, Driver's License, Photo ID, or others (refer to the image below).

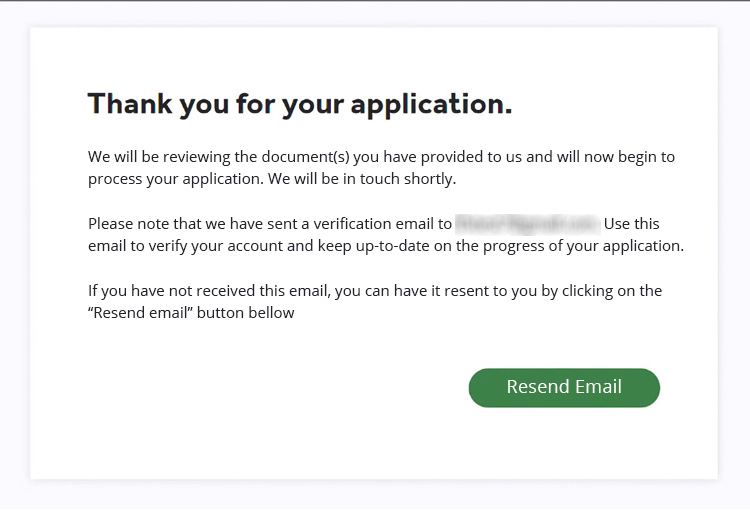
13. Your application has been submitted! You will receive an email for your account completion along with your account ID and other information. Just simply open your email and verify your account. Then wait for your documents to be reviewed by the broker. This will probably take a few hours or so. Once it's done, you can immediately fund your account and start trading.
Keep in mind that at any step of the registration process, there's a "Save Application" button that allows you to save your application progress. This means you can close the application and come back at any time without having to input your data twice. This might be helpful if you needed some time to prepare certain documents like Proof of Identity or Proof of Residence.
Summary
All in all, opening a trading account in OANDA is very easy to follow, even for complete beginners. The process is also very quick compared to other brokers, so there's no need to wait for too long to start depositing your money. Just make sure to check the availability of the broker in your country before you register and choose the right trading account depending on your needs and expertise level. If you need an account to practice, you can open a demo account for free and immediately try the features offered.
OANDA is an award-winning broker with an outstanding reputation for more than 25 years in the trading industry. The broker supports excellent customer care and transparent pricing on state-of-the-art platforms.


19 Comments
Mikayla
Dec 9 2022
Is OANDA accept US clients?
Angel
Jan 1 2023
Steven
Dec 11 2022
What are the deposit methods offered by OANDA?
Jude
Jan 1 2023
Kalsey
Dec 13 2022
Is full account verification required for all clients?
Sandy
Jan 1 2023
Kevin
Jun 28 2023
@Kalsey: Yes, full account verification is required for all clients at OANDA. It is a standard procedure followed by reputable brokers to ensure regulatory compliance and maintain the highest level of security for both the client and the company. Account verification typically involves providing valid identification documents, proof of residence, and other necessary information to confirm the client's identity and comply with anti-money laundering (AML) regulations. By completing the verification process, clients can gain access to all the features and services provided by OANDA, including deposits, withdrawals, and trading activities. It is an essential step in establishing a trusted and secure relationship between the client and the broker.
Winston
Dec 21 2022
Is opening an account in OANDA completely free?
Billy
Jan 1 2023
Clara
Dec 26 2022
Does OANDA offer any type of welcome bonus?
Sebastian
Jan 1 2023
Maikel Jaki
Mar 25 2023
Clara:OANDA, like most reputable forex brokers, does not offer welcome bonuses or other promotional incentives to attract new clients. This is because such bonuses can sometimes be seen as a conflict of interest and could potentially influence traders to make risky or uninformed trades in order to meet bonus requirements. Instead, OANDA focuses on providing transparent and competitive trading conditions, including tight spreads, low commissions, and fast execution speeds, as well as a range of educational resources and trading tools to help traders succeed in the forex market. It's important to note that when ing a forex broker, traders should prioritize factors such as regulatory compliance, security of client funds, and overall trading conditions over any potential bonuses or promotional offers.
Morshed Khan
Mar 25 2023
What are the key steps and considerations involved in opening an account with OANDA, and how do these steps differ depending on the type of account a trader wishes to open? Specifically, what types of accounts does OANDA offer, and what are the requirements and features of each account type? Additionally, what are the requirements for identity verification and funding an OANDA account, and how can traders ensure that their accounts are set up correctly and securely? Finally, what are some best practices for ing an account type and funding a new account, and how can traders make the most of OANDA's trading platform and educational resources once their accounts are open?
Zehan
Jun 29 2023
When it comes to opening a trading account with OANDA, the process is incredibly user-friendly, even for complete beginners. Plus, it's quick too, so you won't have to wait around for ages before you can start depositing your hard-earned money. Just remember to check if OANDA is available in your country before registering, and make sure to choose the right trading account that suits your specific needs and level of expertise. If you're looking for a risk-free way to practice, you'll be pleased to know that OANDA offers a free demo account where you can try out all the features they have to offer. So, do we need to go through the KYC process when opening an account with OANDA?
Olliver Jay
Aug 14 2023
Wow, I think entering the US trading market is very difficult due to the numerous strict regulations related to trading. Only a few brokers can operate in the US, and the great thing is that OANDA is one of the brokers that has successfully expanded its presence in the US market.
In my opinion, OANDA is a good broker for trading. The proof of this is that this broker is accepted in the US market, known for having one of the most stringent financial regulatory bodies in the world. However, just being able to enter doesn't guarantee that a broker is good and safe for trading. Before this, I wasn't sure whether the OANDA broker was safe or not. If any of you have information, could you please help explain the broker's security? Thanks, guys...
Hanna
Aug 15 2023
Hello, friend. I wholeheartedly agree with the points you've made regarding the security of this broker. As previously mentioned, OANDA is a secure choice for trading due to its regulatory oversight by a US regulator.
Furthermore, OANDA has received numerous accolades in the realm of trading. Over the years, they have garnered various awards for their services and products. Notable among these are the Best Educational Material award in 2018 (Investment Trends – US Foreign Exchange Report) and the distinction of being ranked as the No. 1 Forex Broker in Singapore in 2017 (Investment Trends Singapore CFD & FX Report). More recently, OANDA was recognized as the Most Popular Broker and awarded Best Forex and CFD Broker in 2020 by TradingView clients during the inaugural TradingView Broker Awards. It's worth noting that TradingView is one of the world's largest social networks for traders, boasting over 15 million registered users worldwide.
OANDA prudently manages customer funds, holding them in accounts with reputable banks. Their policy is to only withdraw customer funds in direct response to trade-related activities or withdrawal requests.
However, it's important to note that, in some countries, such as Samoing, negative balance protection may not be available. Consequently, traders from these countries may potentially incur losses exceeding their initial investment.
Read more: Is OANDA a Good Broker for Beginners?
Yosselyn
Aug 22 2023
I actually like trading at this OANDA broker, because the customer support is quite agile and responds quickly, especially when compared to the complicated trading software available from other brokers. Apart from that, the educational features are very supportive, especially for beginners just starting to trade. OANDA offers proper client education, in addition to excellent research.
But unfortunately, US traders who cannot use all the trading instruments offered, only offer trading with currency pairs and forex. This is a limitation for American traders who like other instruments.
and as many traders know, it is precisely in this era that trading cryptocurrencies and CFDs is increasingly popular among traders. Even if you can get access, it's good for the image of this broker. I really do not like this.
Charles
Aug 23 2023
Wow, wow, this means you missed the hot news from this OANDA broker. OK, fine, I'll tell you that at the end of October 2022, American traders will be able to access Cryptocurrency trading instruments. This broker announced the launch of a new cryptocurrency trading offering on the US market, designed to give investors easy access to crypto alongside their existing forex portfolio in a secure environment.
As you have explained, trading cryptocurrencies is very popular among traders these days, and OANDA has proven itself as a trading provider with access to trading cryptocurrencies for its customers in the US.
Everything from opening a Paxos account to funding to trading is managed within the app so investors can seamlessly access major cryptocurrencies such as Bitcoin, Ethereum and PAX Gold against the US dollar from an intuitive platform.
Even though US traders cannot access CFD instruments yet, the OANDA broker has proven its reliability by adding access to cryptocurrency instruments in America (US). and this is a good step for this broker to provide trading convenience for its customers, especially those in the US. Maybe in time, OANDA will also be able to gain access to CFD instruments. No one knows about this.
Xiumin
Aug 24 2023
Charles:
Yeah, I have also heard the news. I think OANDA is currently a good broker for cryptocurrency trading. The launch of this offer presents an opportunity for traders to gain exposure to cryptocurrencies in a smart way with a trusted brand.
Cryptocurrencies were born out of a counterculture—the desire to trade currencies that are not regulated by any central bank and are not influenced by national currencies and major economic events. However, the interest of traders in trading cryptocurrencies continues to grow every year. That's why OANDA is ready to meet the increasing demand for crypto trading by making cryptocurrencies accessible to all traders, including those in the US.
Oh, and let's not forget that OANDA has years of experience and an unrivaled track record of offering forex and other derivative instruments for trading worldwide. OANDA's crypto partner, Paxos, is a leading provider of regulated blockchain infrastructure.
The functionality provided by the OANDA app goes beyond basic 'buy & sell'; traders can set limit and stop order parameters in their account and implement take profit and stop loss strategies on their positions.