 Dedicated FREE FOREX VPS
 Free FOREX Virtual Private Server
 MT4 Demo Contest, Get $500
 Sign Up for an Account, Claim 60% Deposit Bonus
 Free MT4/MT5 VPS 2024
 Send E-mail and Get Free Merchandise
 $1K Refer a Friend Bonus for Pepperstone Pro clients
 Maximize Your Earnings with 100% Deposit bonus
 Trade to Win, $5,000 Monthly Demo Contest
 Claim 30% + 15% Deposit Bonus from LiteFinance
Becoming an Exness client is very easy. Read this guide to find out how to open a new account in Exness, including the steps and what you need to prepare.
There are many popular forex brokers out there, but not all of them can suit your taste and fulfill your needs as a trader. Exness is one of the leading brokerage firms with offices in Seychelles, UK, and South Africa. With over 280,000 active clients worldwide and more than 10 years of experience, the broker holds its leading position in the industry. Currently, the broker offers over 100 pairs of forex, stocks, energy, metals, and CFDs on cryptocurrencies. Exness is also known for its high-quality services and favorable trading conditions, such as low trading fees, instant execution orders, and easy withdrawal of funds.
Exness offers various trading platforms, namely MT4, MT5, MultiTerminal, MT4 Web-Terminal, and Mobile Platforms. This allows you to easily access the market whenever you like. When it comes to funding your account, Exness also accepts a wide variety of payment methods, such as Visa and Mastercard, internal money transfers, and e-wallets. If you are interested to register in Exness, this guide will provide everything you need to know about the registration process and how to make a new Exness account.
Contents
How to Set Up Your Personal Area
The very first step in becoming an Exness user is to register a Personal Area on the broker's web or mobile app. This will allow you to be able to log in to the Exness app. The steps are as follows:
Via Web
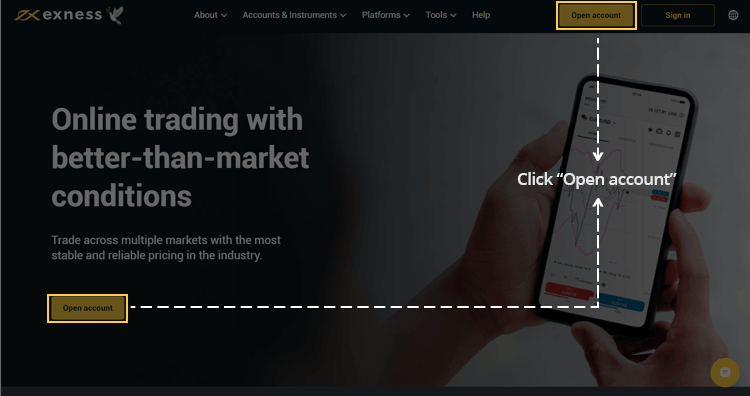
1. Visit Exness' official webpage and click on the "Open Account" button.
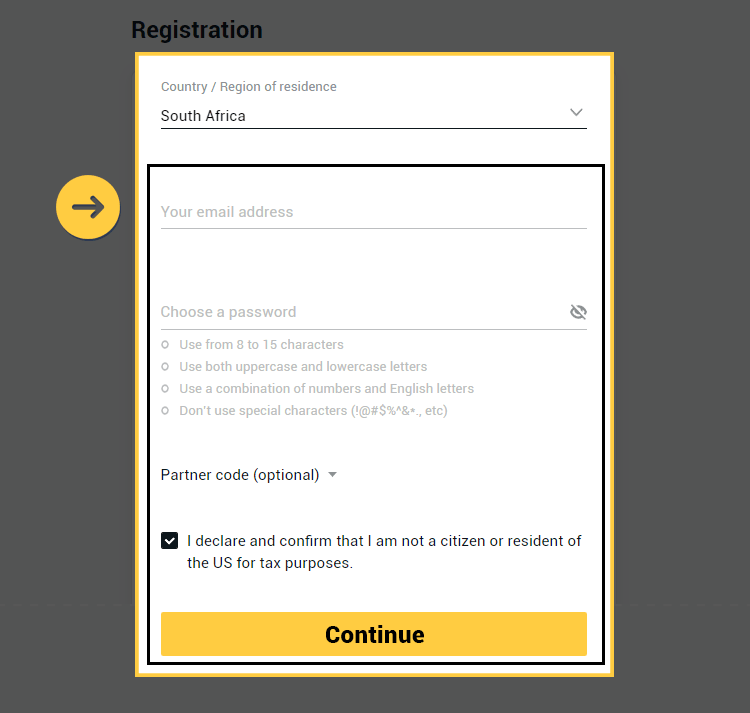
2. Select your country of residence. Keep in mind that this cannot be changed and will impact which payment systems are available for you.
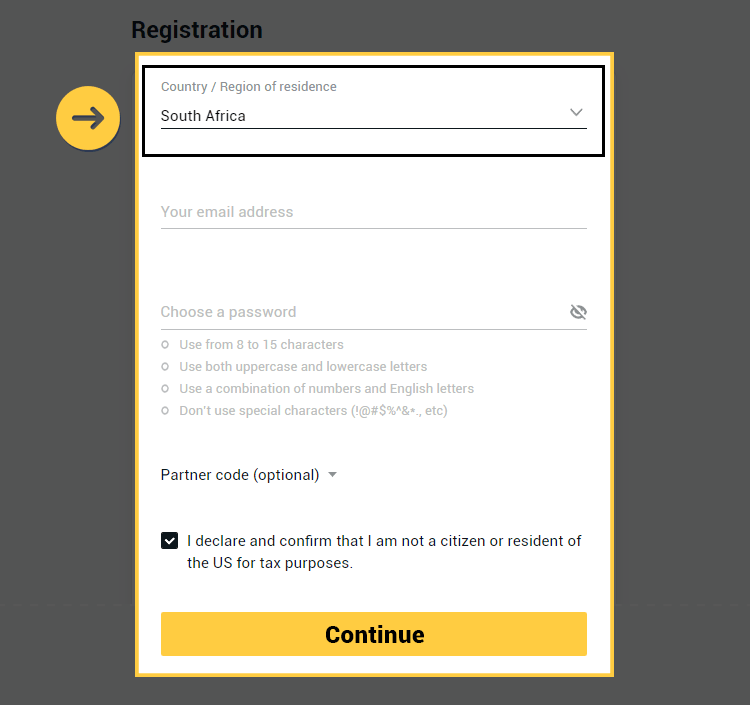
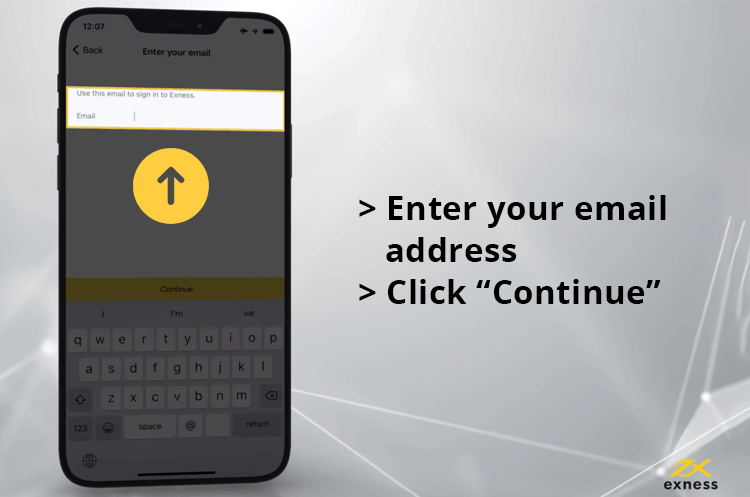
3. Enter your email address and create a password for your Personal Area. The password must contain 8-15 characters, including numbers and lower and uppercase letters. If you have a partner code, there's an optional space to enter the code and link your account to the Exness partnership program. Don't forget to also tick the box below it to confirm that you are not a US citizen. Click "Continue".
4. You will be directed to the Exness Terminal. Click the icon on the top right corner to open a new tab for your Personal Area.

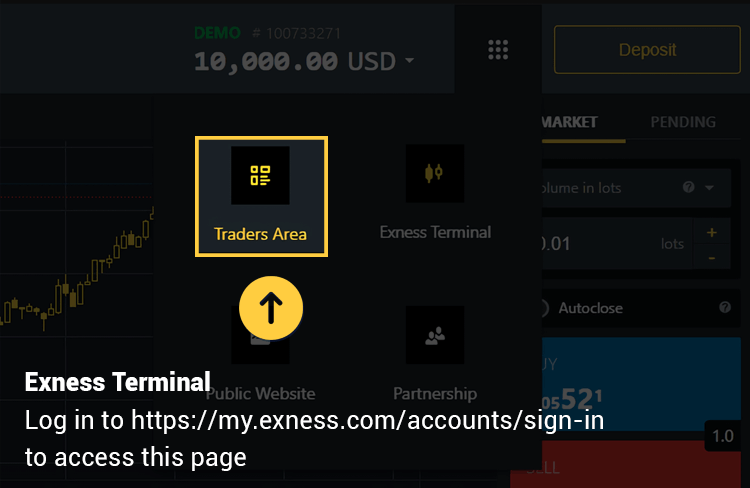
5. Congratulations, you have created a new Exness Personal Area. You can sign in to your Personal Area by using your email and password.
Via Mobile App
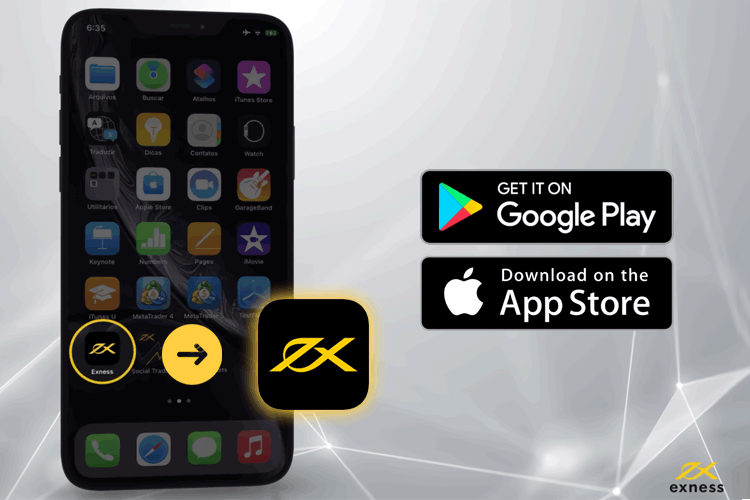
1. Download the Exness Trader app from the App Store or Google Play. If you can't download it from one of the stores, you can also download the app from the Exness homepage.
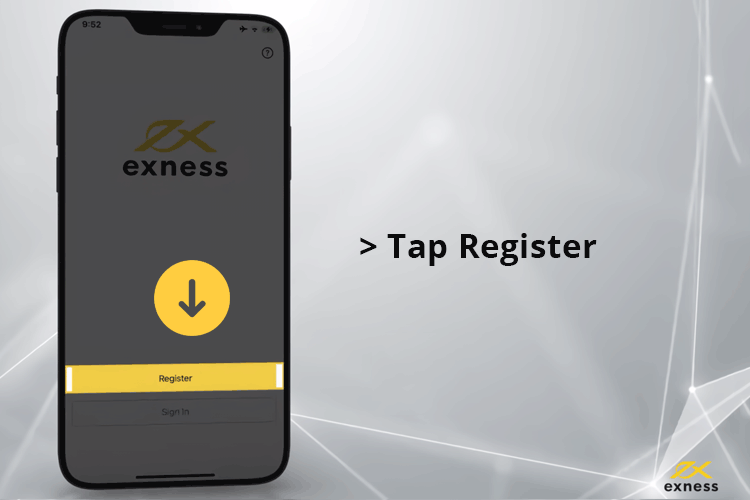
2. Once it's installed, launch the app and choose "Register".
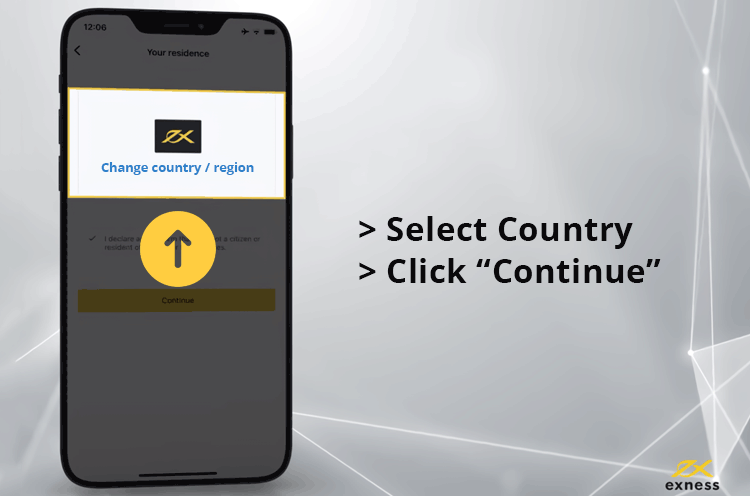
3. Select the country where your mobile phone is registered, then click "Continue".
4. Enter your email address and tap "Continue.
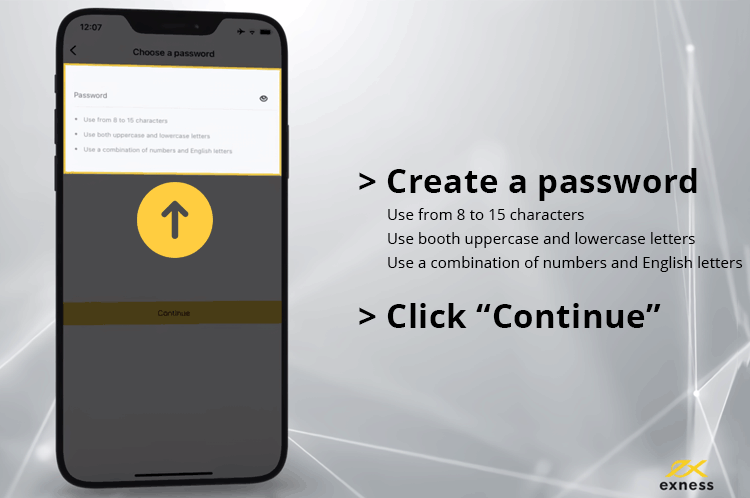
5. Create a password for your Personal Area. The password must contain 8-15 characters, including numbers and lower and uppercase letters. Click "Continue".
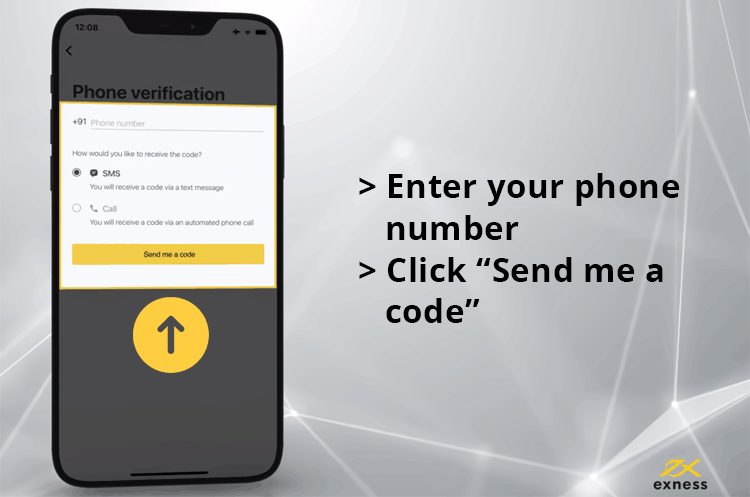
6. Enter your phone number to register your Exness account. Make sure that the number is active in the ed country. Tap "Send me a code" to continue.
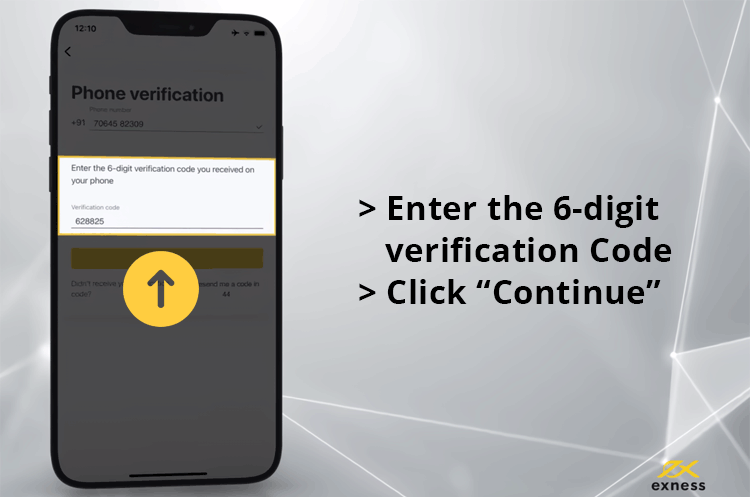
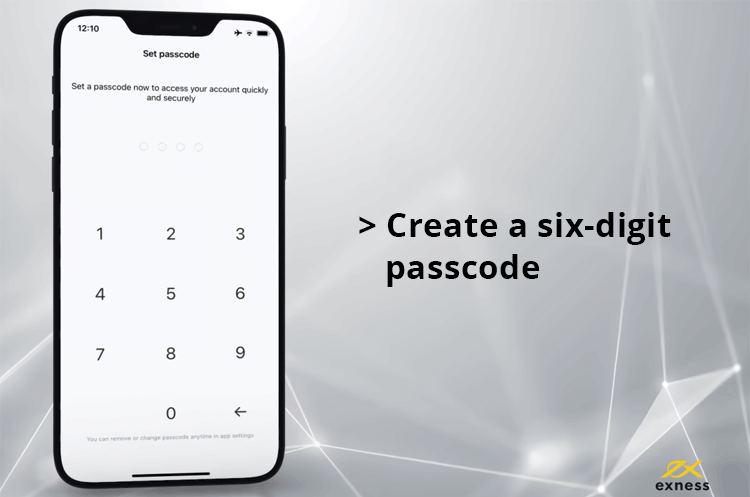
7. Enter the six-digit verification numbers sent to your mobile number via SMS and click "Continue".
8. Create a six-digit passcode to access your account quickly, and re-enter it to confirm.
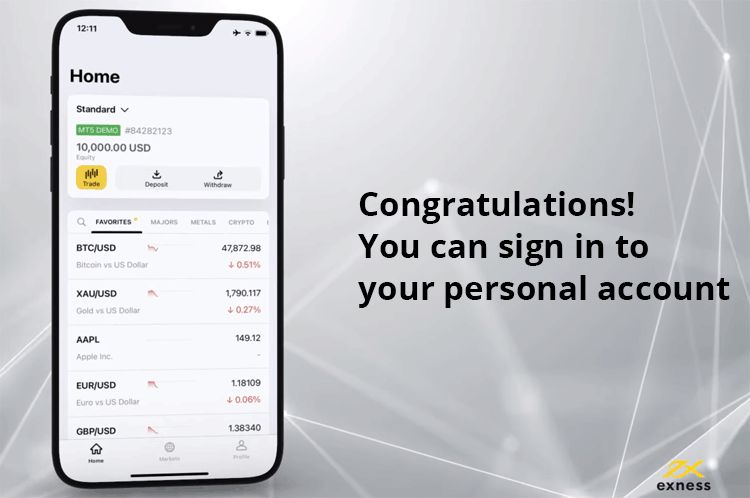
9. Congratulations. You've set up your Personal Area on the Exness Trader app. You can sign in to your Personal Area by using your email and password. You can also check the account and login number to make sure that your data is correct.
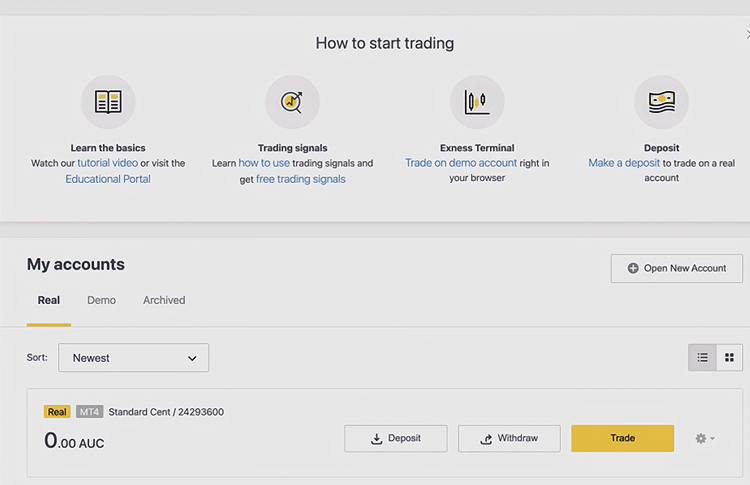
How to Create a New Trading Account
By default, you will automatically create a real trading account and a demo trading account (both for MT5) when you register for your Personal Area. So, if you have created a Personal Area, you can immediately fund your account and start trading. However, it is also possible to open new trading accounts if you want.
Here are the steps that you should follow:
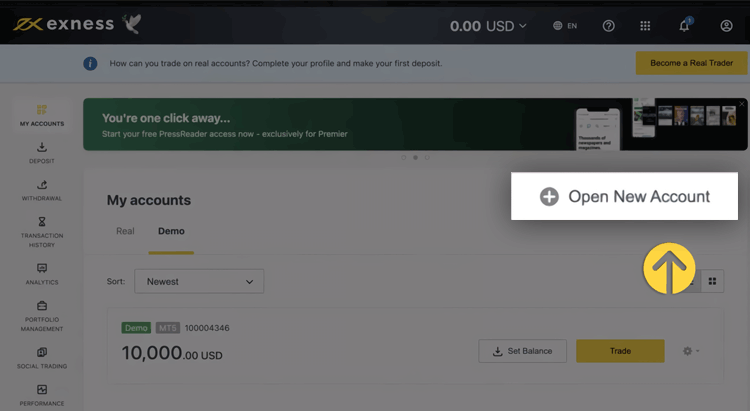
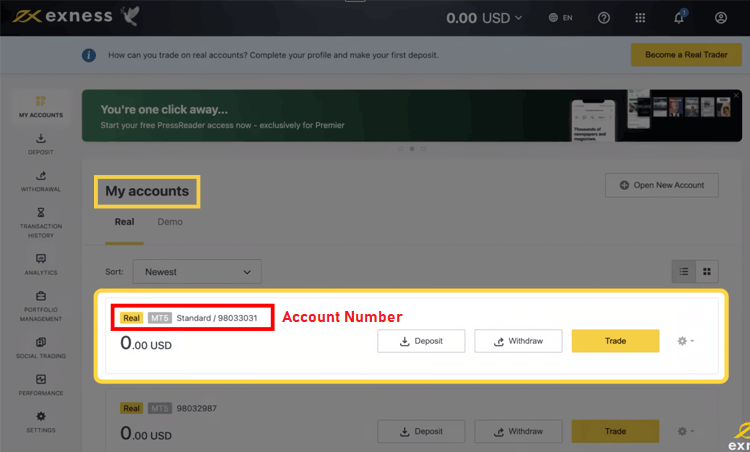
1. Log in to Exness and enter your Personal Area. Click on the "My Accounts" tab to see your current accounts. Then, click "Open New Accounts".
2. Select your preferred trading account type, and choose whether you want to open a real or demo account.
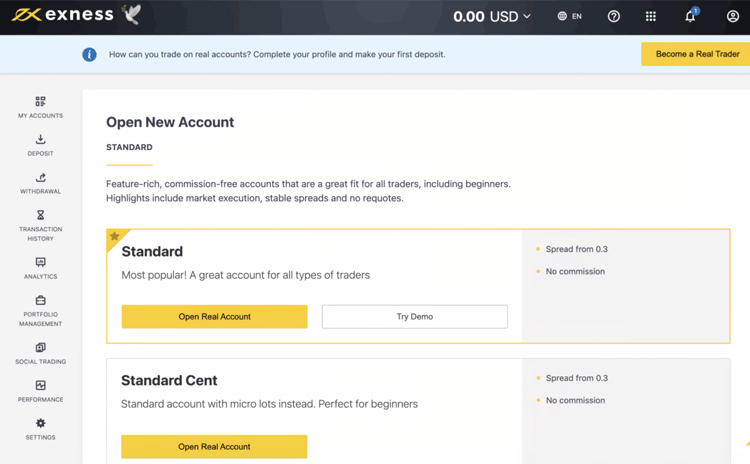
3. On the next page, you'll see the following settings:
- Another chance to a Real or Demo Account.
- An option between MT4 and MT5 trading platforms.
- Set your Maximum Leverage.
- Select your account currency. Note that this can't be changed once set.
- Create a nickname for this trading account.
- Create a password for your trading pass. The password must contain 8-15 characters, including numbers and lower and uppercase letters. Keep your password safe as you won't receive it via email.
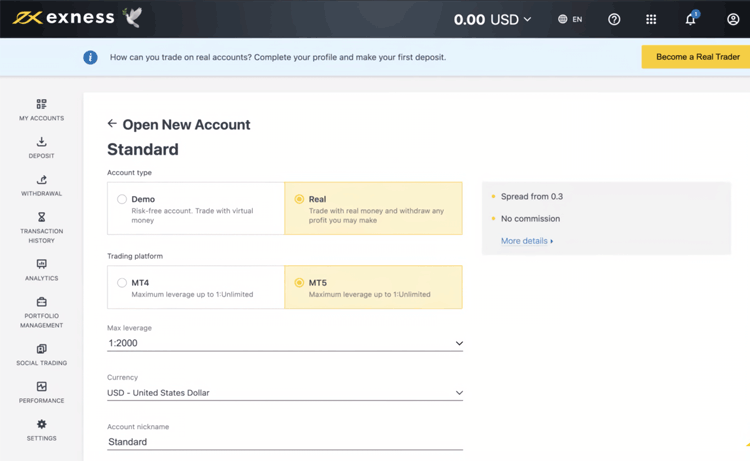
4. Click "Create an Account" once you're satisfied with the account settings.
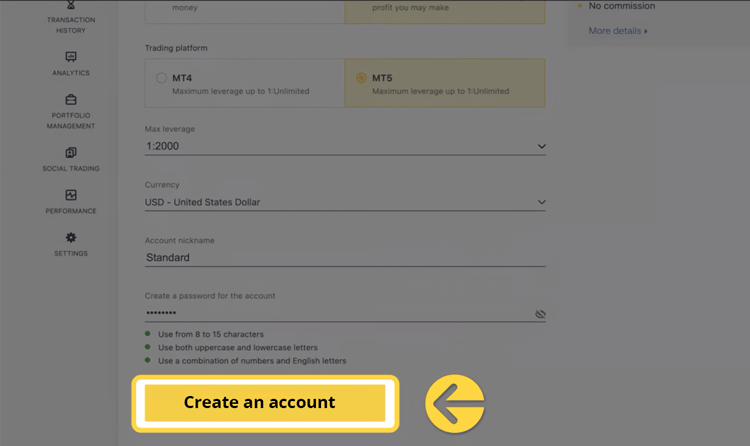
5. Congratulations. You have opened a new trading account. Your new account will appear in the "My Accounts" tab.
Exness Full Account Verification
When you open an Exness account, you have to complete the full verification process in order to enjoy unlimited access to all Exness services. This is a part of the protection measure to optimize clients' safety and financial transactions.
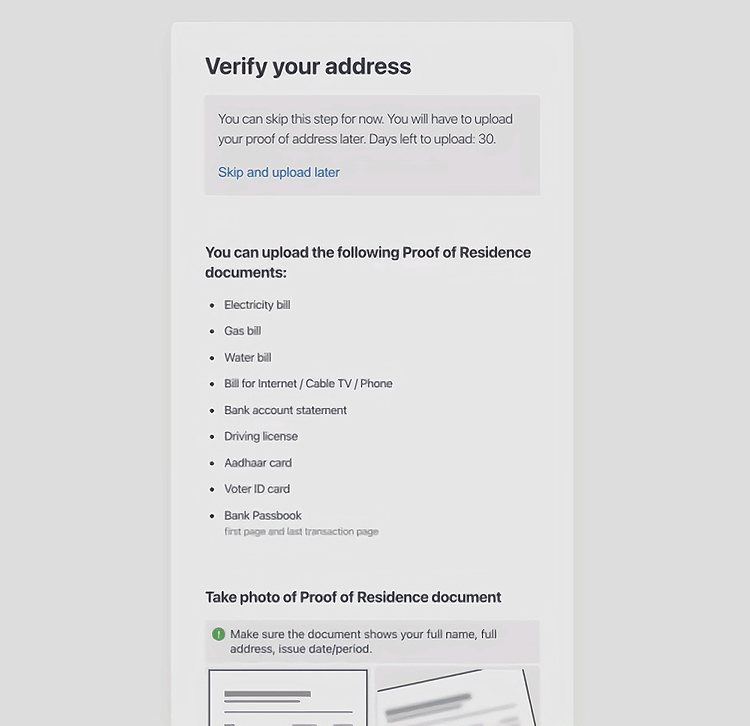
From the day of your first deposit, you are given a time limit of 30 days to complete your verification process. You can check the remaining days for verification in your Personal Area. If you are failed to fulfill the requirements within the 30-day limit, all of your deposits, transfers, and trading functions will be temporarily deactivated until you complete the verification process.
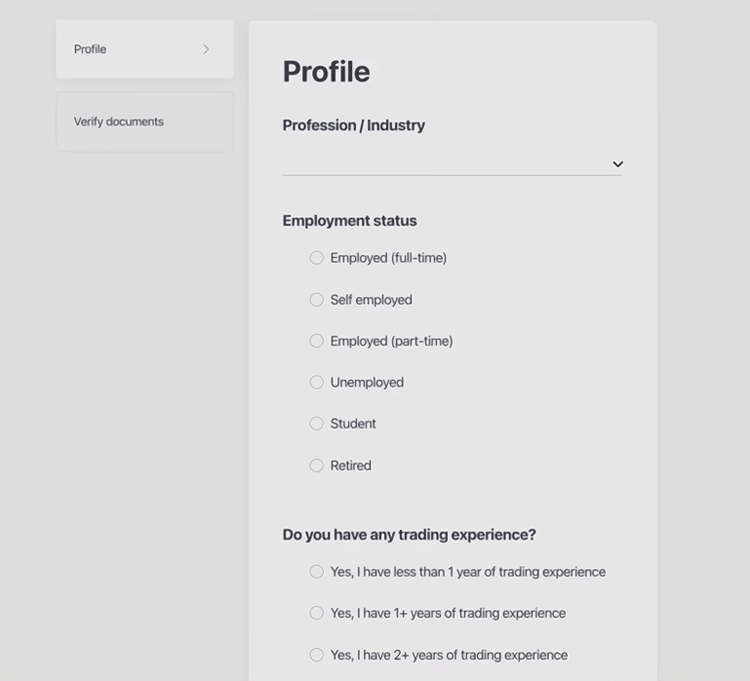
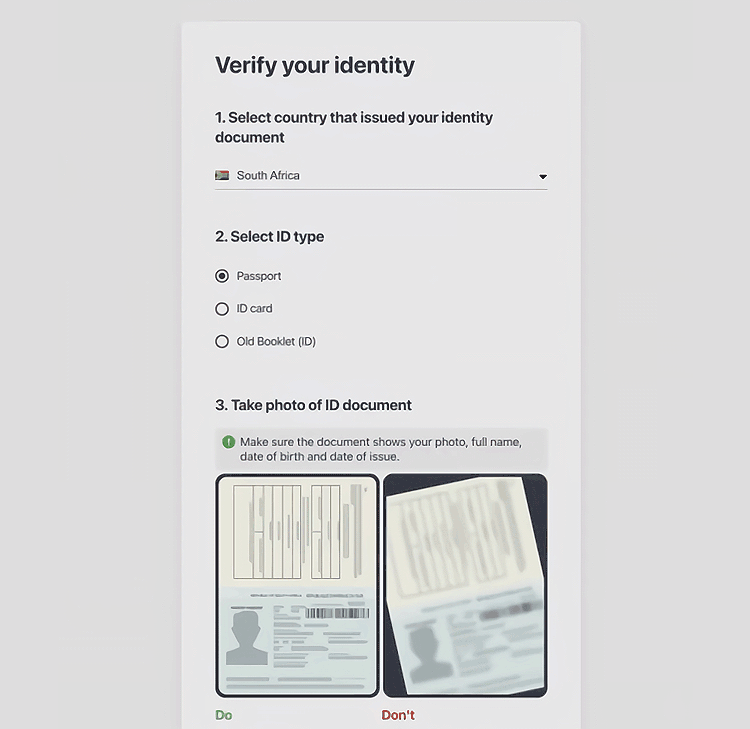
In Exness, the full verification process requires you to complete an Economic Profile and submit Proof of Identity (POI) as well as Proof of Residence documents. The Economic Profile is basically a survey containing several questions regarding your trading experience. Meanwhile, the POI and POR require you to prepare certain documents issued by the authority in your country.
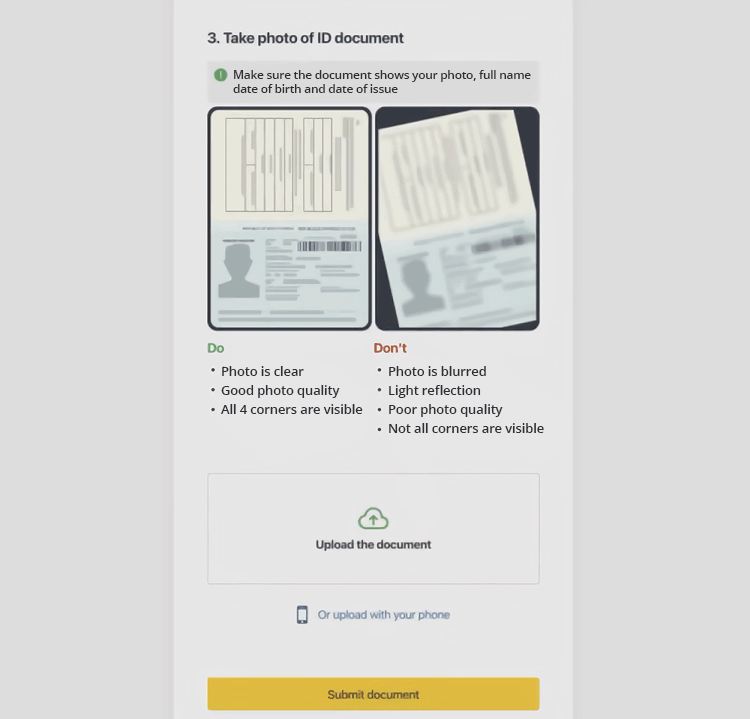
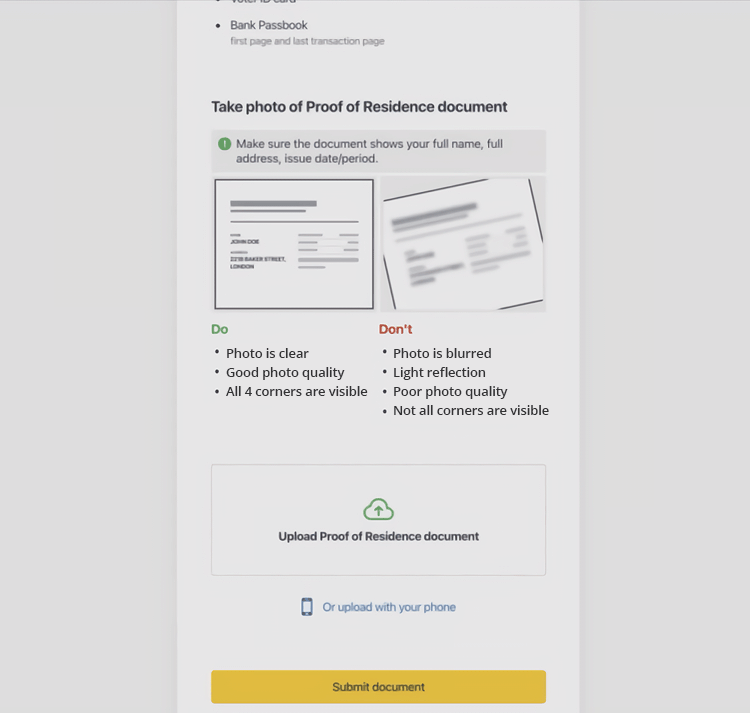
Before submitting, please make sure that the documents meet all of the following criteria or they may be rejected:
- The document must show your full name.
- The document must show your photo.
- The document must show your date of birth.
- You must be 18 years old or above.
- Your full name must match the document exactly.
- The document must be valid and not expired (at least one month of validity).
- If the document is two-sided, you should upload both sides of the document.
- Make sure that all four edges of the document are shown.
- Make sure to upload high-quality pictures.
- The document must be officially issued by the government or legitimate authority.
- The document can be a photo, scan, or photocopy.
- Accepted document formats are jpg, jpeg, mp4, mov, webm, m4v, png, bmp, and pdf.
- The document's file size must be under 64 MB.
Proof of Identity
Documents that can be submitted as Proof of Identity including:
- International Passport
- National Identity Card/Document
- Driver's License
- Permanent Residence Card
Proof of Residence
To provide Proof of Residence, you can prepare:
- Utility Bill (electricity, water, gas, internet, landline telephone)
- Recent Bank Statement
- Local Tax Bill
- Reference Letter from the Bank (located in your area)
Please note that you can use any document type listed in the POI section too as long as they have not been used for POI verification.
How to Fully Verify Your Account
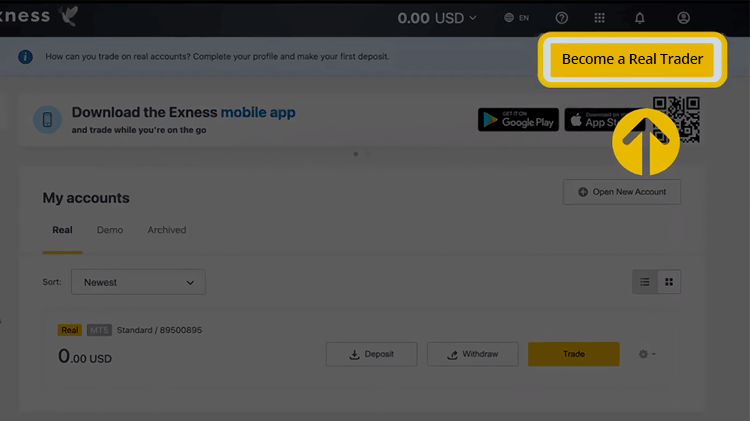
1. Log in to your Personal Area on Exness website. Click the "Become a Real Trader" button located in the top right corner.
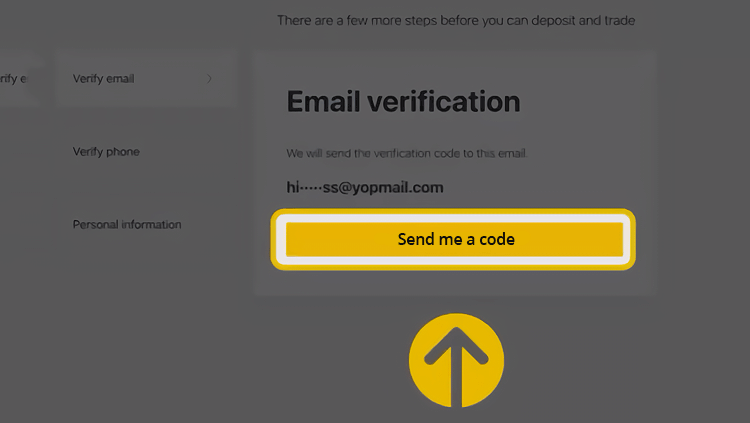
2. Click "Send me a code" to verify your email address. Enter the code sent to your email, then click "Continue".
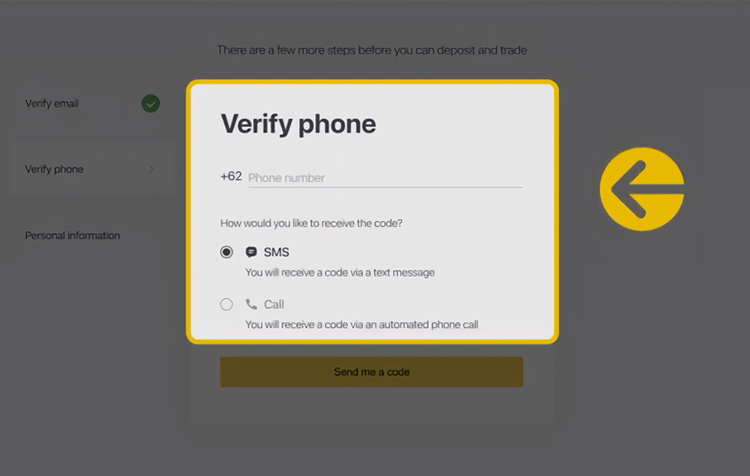
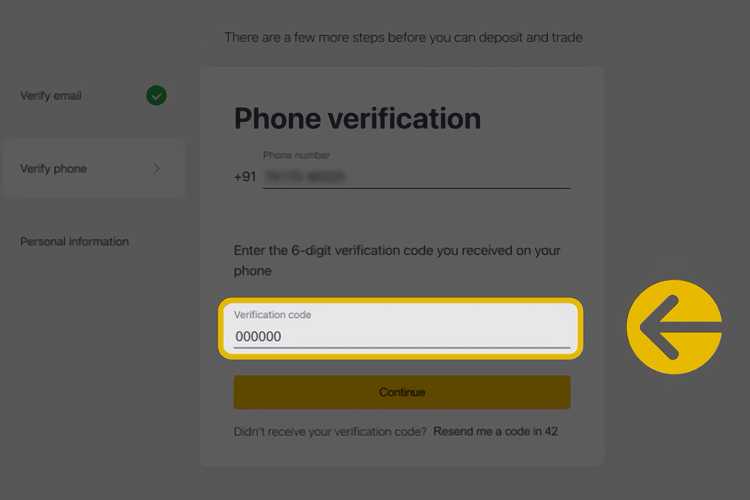
3. Enter your phone number and choose whether you want to get the code from Exness via SMS or call. Click "Send me a code". Enter the code sent to your phone, then click "Continue".
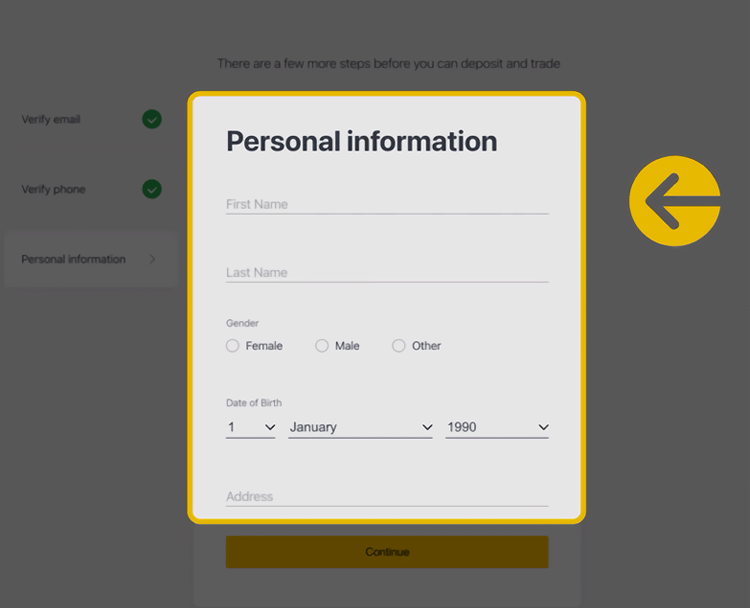
4. Complete the personal information with your details. This includes your first name, last name, gender, date of birth, and address. After that, click "Continue".
5. You'll see a message from Exness confirming your email, phone number, and personal information. Click "Continue Verification" to proceed to the next step.

6. Complete the Economic Profile. This survey is regarding your trading experience required to lift deposit and trading limitations. Click "Continue" once you're done.
7. The last step is to submit your verification documents to Exness. But before that, confirm your legal name first. Make sure that your name is exact and consistent across all documents and payment methods associated in the future. Click "Upload Documents" to continue.
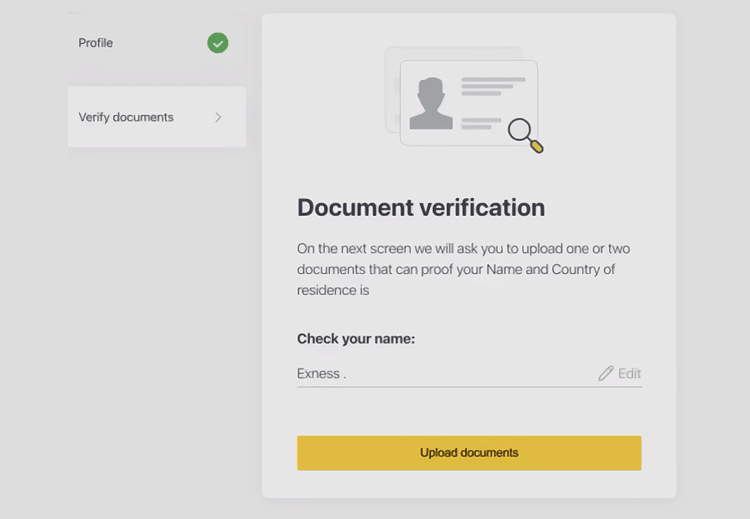
8. On the next page, submit your Proof of Identity document. Select your country and type of document. Click "Upload the Document" and find the digital copy to attach. Click "Submit Document" once it's attached.
9. Lastly, submit your Proof of Residence to Exness. Read the requirements closely and click "Upload the Document" to find the digital copy of your document. Once it's done, click "Submit Document".
10. At this point, your account status is still pending and not fully verified just yet. Your account status will become fully verified automatically once the broker's done reviewing your documents.
Limitations to Unverified Accounts
Certain limitations are placed on accounts that are not fully verified yet. The limitations depend on the information provided to and verified by Exness. Here are the details:
- Accounts with only a registered email address and/or personal information and mobile phone number completed will have a maximum deposit total of 2,000 USD.
- Accounts with a registered email address and/or personal information, mobile phone number, Economic Profile, and Proof of Identity completed will have a maximum deposit total of 50,000 USD.
- Deposits via cryptocurrency and bank cards are not available in unverified accounts.
Conclusion
The process of opening a new Exness Account is easy and relatively quick. You can choose to register either via Exness' website or mobile app. Just follow the instructions and make sure that all of the information you provide is valid. Aside from that, make sure to also complete the full verification process by submitting the Economic Profile, Proof of Identity, and Proof of Residence. If you need further assistance, don't hesitate to contact the broker's excellent customer service either via email, live chat, or phone.
Exness is a forex and CFD brokerage that serves clients to trade across multiple markets with the most stable and reliable pricing in the industry. Their features include spreads as low as 0 pips and maximum leverage of 1:unlimited.

39 Comments
Nooa
Dec 17 2022
Can I withdraw to my friend's bank account?
Claravia Sidney
Jan 7 2023
Selena
Dec 18 2022
Thank you very much for the very helpful explanation, in my opinion the steps for opening an account at Exness are very easy, and completely digital. But I got confused in the section "how to create a new trading account". if I want to open several personal areas using the same address or one email address, is that possible or not? And also if I don't complete account verification at Ecness, can I still get access to Exness services or can I trade at Exness? if anyone knows please explain guys...
Divany
Dec 27 2022
Selena: Hi, Selena. It is possible to open multiple accounts at Exness. According to the broker's website, all account types (excluding Standard Cent) have a limit of trading accounts per Personal Area is 100. So, in total, each Personal Area can open up to 400 trading accounts. Secondly, the account verification is mandatory, so you will need to complete the verification process within the time limit (30 days). Otherwise, you won't be able to make deposit, transfer, and use any trading functions.
Jackson
Dec 18 2022
I am happy to know that exness has a good, fast and digital account opening system. However, the application only provides one option to open an account, namely with an email address only. Even though I also hoped for other options such as using Facebook or Google social media for example. If there are several ways to open an account, it will definitely be even more interesting to make opening an account at Exness more varied. This is not my fault, because of course every trader has a way that is suitable and easier for them if they want to open an account in a broker application such as Exness.
William
Dec 18 2022
I'm still confused... I'm trying to verify my account, the "verify proof of residence" section is taking too long, even up to 4 days the status is still being verified. Why so long huh? is there really an improvement in the system or is the verification stage really long? If anyone knows please provide a solution.... In my opinion, the verification stage is also too complicated, there are lots of documents that must be fulfilled. Maybe it can be made easier and simplified for the terms and conditions of account verification in the Exness application.
Jessica
Dec 18 2022
William: I will help you answer, yes, my friend, maybe you can wait a little longer, usually if it has been verified, Exness will contact you. It could be that the verification process takes a long time due to system problems or the document you uploaded is blurry, so the process also takes a long time. if the photo from a document is blurry, because the system identifies it, then the system will have trouble verifying it. but if there is a problem from the system itself, then that means an internal problem from Exceness, the system needs to be repaired again.
Kenzie
Dec 18 2022
William :Previously, I agree with your opinion, that the process and documents that must be fulfilled in verifying an account at Exness Trading are quite a lot of documents that must be fulfilled and are complicated, for example utility bills. Even though there are several brokers who provide account verification services, only requiring one or two identity documents, such as proof of ID card/SIM alone, can be verified. For document file sizes under 64 MB, in my opinion, at Exness it is quite large so you don't need to worry about exceeding the size.
Reuben
Dec 19 2022
What happens if I fail to verify my account before the grace period expires?
Clara
Jan 27 2023
Reuben: I guess account verification is important for all traders who register with every broker, including this Exness broker. Even though at Exness, as far as I know, it's still possible to make a deposit, it's limited to around 2000 USD. So I think you are advised to verify your identity as soon as possible
Because of its nature related to money and not a few numbers are generated, therefore to secure your account, Verification is very, very important to do, so that there is no misuse of the account by other parties. And when there is misuse by other parties, all you have to do is submit proof of your personal data as you uploaded it before.
At Exness if you do not verify more than 30 days after account registration, the deposit, transfer, and trading functions will no longer be available. And maybe you won't be able to do trading at Exness.
Honey
Dec 21 2022
Is there a minimum and maximum withdrawal amount?
Sweety
Jan 27 2023
Honey: I have always been impressed by the various deposit and withdrawal methods Exness offers. I've been using Exness for the past 2 months, but I've always been surprised by the sophisticated features at Exness, account registration which is hassle-free, and it's also recommended to verify the account to secure the account. The process from registration to account verification, in my opinion, is quite fast, less than 2 days.
At Exness for deposit issues, if you haven't verified your account, you can only deposit a maximum of 2000 USD, but if your account has been verified by Exness, you can deposit up to 50,000 USD. for the minimum deposit i.e. the minimum deposit is $10 for non-Vietnamese traders and $15 for Vietnamese traders.
As far as I know, the minimum withdrawal set by Exness is 1 USD. but there is no limit to the withdrawal amount. So you are free to withdraw large amounts of money. But yes, I suggest withdrawing small amounts of money is better, I'm afraid there will be obstacles in the process.
Apollo
Jan 27 2023
Sweety: I agree with what you explained, but there are some corrections that I made, which are related to the minimum withdrawal at Exness. At Exness there are several methods of depositing and withdrawing funds, starting from credit cards, bank transfers, Neteller, Skrill, and several other online payment systems through the Exness payment portal. for currencies, Exness has provided a choice of more than 40 base currencies, so maybe your country is included in the category of base currencies.
So, because there are several withdrawal methods, the minimum withdrawal amount varies. like in Webmoney, the minimum withdrawal is $ 1, with a virtual account, Bank Card, Oris, or Bitcoin the minimum withdrawal is $ 10. and there is a minimum withdrawal of $ 15 with the Internet banking withdrawal method, there is also a minimum of $ 100 if you use USD Coin (USDC ERC20) and Tether (USDT ERC20).
so yes, if you want to make a withdrawal, you must first check which withdrawal method you use and adjust it to the funds you want to withdraw.
Manganiello
Dec 22 2022
Can I withdraw using several methods?
Cleopatra
Jan 27 2023
Manganiello: Exness provides a variety of withdrawal methods. Essentially choose from a flexible range of withdrawal options in your country's currency, including the world's most popular payment systems, e-wallets, and crypto-wallets.
At Exness, withdrawals are available using internet banking, bank cards, Virtual Accounts, Oris, Neteller, Sticpay, Tether, Webmoney, USD Coin, Perfect Money, FasaPay, and Bitcoin. You can choose all of these payment methods through the Exness payment portal.
So you can choose one of several withdrawal methods that are comfortable for you. Withdrawing at Exness also doesn't take a long time, only around 2-3 days for your money can be received. With all the convenience of withdrawals, Exness also does not charge fees for withdrawals.
Andonios
Jan 27 2023
Cleopatra: I have been using this Exness broker for about 5 months, and I guarantee that Exness is a broker with fast trading services. starting from registration and account verification to depositing and withdrawing funds, everything is easy and has a good system. if you ask if I am comfortable with this broker? the answer is of course. who is a trader who doesn't like services and features that are sophisticated and easy to use?
if you use several methods of withdrawing funds in your trading account or also with several wallets in the same payment system. At Exness, you can make withdrawals using several methods. However, there are things that you must pay attention to when withdrawing, namely funds must be withdrawn in proportion to the amount you deposited.
Dove
Dec 26 2022
How long does it take to withdraw using bank transfer?
Apollo
Jan 27 2023
Dove: As far as I know, the withdrawal method via bank transfer is a bad withdrawal method, in my opinion. so if you want to make withdrawals at Exness using the bank card method, it's better to just change to another method. because it's been quite a long time.
Indeed, all withdrawal methods provided by Exness have been processed instantly by Exnes. But if you use the bank card method, the hassle is that your withdrawal request is then sent to our card processor and your bank. This entire process can take from 7 to 10 business days for the funds to arrive in your bank account.
that's really long, guys, if it's 10 days, you better choose another bank method, like internet banking. if internet banking is very fast, in about 2 days you can already receive the money.
Anthony
Dec 30 2022
Hey there! I just wanted to express my gratitude for the article that provided me with the step-by-step instructions and guidance to open an account with Exness. It was incredibly helpful, especially when it came to uploading my documents to complete the process. Now, I'm eagerly waiting for the verification to be done! It was as easy as pie, thanks to the article!
By the way, I have a question about the types of accounts I can open with Exness. I'm curious to know if I have the option to open multiple accounts and if these accounts can have different specifications. If that's the case, I was wondering if I need to go through the KYC process again for each account. Can you provide some insights into this?
Thanks again for the informative article! It has been a great resource for me, and I appreciate any additional guidance you can provide regarding the account opening process at Exness.
Ousimen
Jan 2 2023
@Anthony: Hey, glad to hear that the article was helpful in guiding you through the account opening process with Exness! It's great that you found it easy-peasy.
Now, to answer your question about multiple accounts, yes, you can open multiple accounts with Exness. The cool thing is that these accounts can indeed have different specifications, such as different base currencies, leverage levels, or even account types like Standard or ECN.
But here's the deal with the KYC process. When you open additional accounts with Exness, you generally don't have to go through the full KYC process again. Once you've completed the KYC verification for your initial account, the subsequent accounts usually go through a simplified verification process. This means you may only need to provide some basic information or documents to get those additional accounts up and running.
Gyu
Mar 29 2023
Actually, I'm still new to the world of trading, and yes, I rarely hear about brokers that provide trading instruments and platforms. You must be familiar with FBS and OctaFx which always appear in several advertisements on chrome and YouTube. while For the Exness broker, to be honest I have never heard of this broker.
And yes, I just found out about this in this article, and yes, what is being discussed here is about opening an account at this broker, it seems that this broker is quite good and the service is quite instant. As already explained, this broker has only been established since 2003, but I can't say for sure whether this broker is good and safe. I asked my friends, is the Exness broker safe for my trading and funds? Is my personal data also safe here? If anyone knows, could you please explain...
Khalid
Mar 29 2023
Gyu: Exness is an international, regulated multi-asset broker operating since 2008 offering global trading in stocks, foreign currencies, metals, commodities, cryptocurrencies and energies. This broker is registered under the name Exness (Cy) Ltd and is officially regulated by CySEC. CySEC is the supervisory and regulatory authority for investment services companies in Cyprus. CySEC is also a member of the European Securities and Markets Authority (ESMA).
This international broker is known as a user-friendly platform and has a high level of transparency. Customer service support is available 24/5 and is available in 13 languages, including Indonesian.
This broker has over 300,000 users and trading volume exceeds $2.4 trillion. With a capital of $ 10, everyone can trade on this platform. These brokers also segregate customer funds from company accounts and store them securely in segregated trust accounts overseen by CySEC. This is to ensure that client funds will not be taken away and not used for the company's operational activities. So, this platform can be said to be a safe broker.
Immanuel
Mar 29 2023
Khalid: Of course yes! Pepperstone is a legit broker. This broker is also regulated by FSCA, FSA, CySEC, FCA, CBCS, FSC (BVI), and FSC (Mauritius).
In addition to licenses from international regulators, Exness also takes a number of steps to ensure the safety of client funds, by doing the following:
Therefore, it is very safe and 100% reliable.
Raghnaid
Mar 29 2023
Khalid: The broker has grown rapidly since its inception and currently has over 145,000 clients worldwide and is regulated by 7 national authorities. In 2012, Exness was licensed by the Cyprus Securities and Exchange Commission (CySEC) and moved its headquarters to Cyprus. Exness closed its retail operations in the EU and UK in 2018 in response to tougher restrictions on retail CFD brokers, but Exness maintains business-to-business (B2B) services in both regions.
In addition, Exness regularly wins industry awards, most recently being recognized as Best Global Forex Customer Service 2019, Best Global Forex Trading Experience 2019, and Most Trusted Global Forex Broker 2019 at the Global Forex Awards.
Overall, we consider Exness a safe broker to trade with, albeit with a few caveats. A broker's withdrawal from the EU/UK market after increased regulation is certainly a consideration, however the broker remains well regulated in many areas.
Taeyang
Mar 29 2023
Gyu: I have been opening accounts with Exness for about 5 years and I have experienced the advantages and disadvantages of Exness. I really like the system and service at this broker, so I feel comfortable keeping my money here. Exness is regulated by several second-tier authorities including the CySEC of Cyprus and the FSCA of South Africa.
I still consider Exness a safe broker to trade with. Firstly, this broker holds licenses from a number of regulators around the world. Second, this broker provides all clients with negative balance protection, which means that traders cannot lose more than their initial deposit. Lastly, this broker is regularly audited by Deloitte, one of the most reputable auditing firms in the world.
In addition, this Broker also provides users with access to advanced trading tools and services, such as technical analysis and charting capabilities. Apart from that, this broker also offers excellent customer service, which ensures that any questions or concerns are resolved quickly. One of the biggest advantages of this broker is the low trading fees. This means that users can maximize their profits by using lower spreads and leverage.
Lalisa
Mar 29 2023
Exness offers nine account types on the MT4 and MT5 platforms – more than most brokers. These offers range from a Standard Cent Account with no minimum deposit to an optional Pro Account with tight spreads, market execution and a minimum deposit starting at 500 USD.
I've been interested in this broker for a long time, but I'm still hesitant to try it because my experience in trading is quite beginner. I'm afraid I can't solve the problem if a problem occurs in trading.
But today I'm sure to try to register first. it only took me about 5 minutes to open an account at Exness. but I'm confused about the next process, which is account verification... can you please explain what needs to be prepared for account verification? Can my account be used for trading after verification?
Farrel
Mar 29 2023
Lalisa: I find the process of opening an account and verifying it at Exness tends to be easy. Our account is verified within 48 hours, which is longer than the industry average, but we were able to make a deposit and start trading while waiting for the verification period.
The verification documents that must be prepared are quite easy and not complicated, in my opinion. the documents include:
Once verification is complete, traders will be able to deposit up to 50,000 USD. however please note that new accounts are ready for trading after two days. If your Exness account is not verified within 30 days of account registration, the deposit, transfer and trading functions will no longer be available.
Reynarl
Mar 29 2023
Exness is one of the international multi-asset brokers that has a good reputation abroad and has been operating since 2008. This company is also officially registered and supervised by 8 financial services institutions and authorities in various countries. The company also regularly wins awards, such as the Best Global Forex Trader and the Most Trusted Global Forex Broker at the Global Forex Awards. This company is also always audited by a trusted auditing institution, such as Deloitte.
At first, I asked, do all brokers offer this complicated and long process? But now I have found the answer, which is not all. it turns out that there is Exness which provides an easy registration and verification process and only requires a few documents.
However, I have a few questions for this broker, does this broker provide cryptocurrency trading for its traders? I'm very curious. As a beginner, may I try it?
Dalton
Mar 29 2023
Reynarl: Wow, you don't know about trading at Exness, do you? Exness offers a sizeable cryptocurrency trade. Usually, brokers only offer a general range of crypto pairs and limit crypto trading to less attractive account types, but that is not the case with Exness. We are impressed by the large number of Forex pairs available at Exness. This broker also offers a decent range of cryptocurrencies, but with extreme leverage – up to 400:1. However, one of the downsides of this broker is that the number of stock CFDs available for trading is limited to just 70 instruments.
Exness offers Bitcoin, Bitcoin Cash, Ethereum, Dash Coin, Ripple, and Litecoin pairs. The pair is available for all account types, and the trading conditions allow for short trades in crypto.
Exness offers a good range of crypto crosses, most of them Bitcoin, including BTC/ZAR and BTC/XAU. This broker also provides Ethereum, Litecoin, Ripple, and other specialty cryptocurrencies. The maximum leverage is 1:400, which is much higher than other brokers. Traders should note that trading with this type of leverage on volatile assets is extremely risky. This can provide increased profit opportunities, but also large losses.
The spreads charged on these cryptocurrencies vary and are much higher than other currencies, but still not much different from those applied by other brokers.
Whalen
Mar 29 2023
Dalton: although I like highly leveraged trading, I would also not prefer highly leveraged trading when it comes to crypto. The risk is too high, the market is also difficult to predict. There are several brokers that provide crypto trading with very high leverage, but it is too risky, Exness is one of them.
Maybe beginners who don't understand crypto volatility think that a leverage of 1:400 is good for trading, even though in fact it is too high in crypto trading. Traders need to pay attention that trading with this type of leverage on volatile assets is very risky. especially for those of you novice traders and want to trade crypto, you can consider Exness IC as a trading provider broker.
Cryptocurrencies are unstable, unregulated, decentralized and almost completely controlled by retail speculators. Trade the newest and most exciting asset class in the form of CFDs with Forex CFD providers.
The price movements of cryptocurrencies such as Bitcoin or Ethereum are mainly influenced by news and sentiment, namely the fear and greed of retail speculators. These sometimes dramatic moves can lead to large daily price swings, making cryptocurrency CFDs an attractive product for the aggressive and experienced day trader.
exness Cryptocurrency CFDs allow traders to hold long or short positions without owning any cryptocurrency. This means that traders can be exposed to cryptocurrency price movements without having to worry about the security risks of holding cryptocurrency and the counterparty risk of cryptocurrency exchanges. It's similar to trading energy futures like oil, in that you don't need to own physical crude oil to speculate on its price.
Tylor
Mar 29 2023
Is Exness a good choice for novice traders?
Sweety
Mar 29 2023
Tylor: Exness is one of the few Market Maker brokers that novice traders can reach. While many other Market Maker brokers fail to provide education and analysis and often force traders to educate themselves through third-party materials, Exness provides a full arsenal of study materials, independent market analysis, and Webinars to provide a comprehensive education to its users. Forex trading. Exness also supports three of the best software options and 24/5 customer service.
Exness offers a comprehensive research section in video and written formats, but we were disappointed to find that it does not offer any trading tools, other than the standard VPS service and Trading Central indicator service. Most other brokers offer a variety of trading tools that can help traders spot opportunities and make analyses.
The educational videos are available in five languages, including English, Arabic, Thai, Indonesian, and Vietnamese. This series of short videos is a powerful explanatory library of important concepts that all Forex traders need to understand.
For traders using algorithms or scalping strategies, Exness is a good choice due to its low trading costs, high leverage, fast connectivity, and large liquidity.
Rose
Mar 29 2023
Sweety: I want to add an explanation so that you are more confident about this broker. It should be noted that Exness customer service is available in English 24 hours a day and during weekends. However, they were unable to help us with some of our questions. Client telephone support is available 24/5 in 15 languages, including Indonesian, and 24/7 in two languages, including English, and Chinese. Most brokers only offer 24/5 customer service, so this is an advantage these brokers offer English-speaking traders.
Other forms of contact include live chat, callback services, telephone, and email. Support is also provided through the Exness help center which is frequently updated with detailed articles covering all common topics, from trading guides to funding FAQs.
Hamilton
Apr 26 2023
I just entered the world of trading at the beginning of 2023, even though I just learned how to deposit. I learned a lot about trading before on websites and participated in many online webinars provided by Exness educational tools.
I was really impressed with the various deposit and withdrawal methods that Exness offers. Also, I like that exness offers instant and no-fee deposits and withdrawals, making funding my account (and withdrawing profits) much cheaper and easier than most other brokers.
I think Exness excels at this service.
Tristan
Apr 26 2023
@Hamilton: I just want to add yes... maybe there are people here who are interested in Exness but are still hesitant to put their money in Exness. Everyone has their own worries, maybe one is afraid that the currency in their country is not included in the base currency at this broker. Well at Exnees you can get rid of such worries, why? Because in this application, you can open an account at Exness, and are given a choice of more than 40 base currencies. Most other brokers only offer 5 – 10 base currencies, so Exness really stands out in this regard. This is a huge advantage for traders around the world who will most likely have bank accounts in their respective currencies so they can avoid conversion fees.
Funds can be deposited in a number of different ways including Credit Cards, bank transfers, Neteller, Skrill and several other online payment systems through the Exness payment portal.
Sietsa
Apr 26 2023
@Hamilton: Hello, brother, I also agree that Exness offers its customers deposits and withdrawals that are hassle-free and that there are no fees. This is what makes Exness one of the brokers that provides the fastest service for its customers. Most traders, especially beginners, are definitely worried about their funds if it takes too long to process, both in terms of deposits and withdrawals.
Why do I say this? Because I have made deposits and withdrawals on the Exness application. In my experience in this matter, if you make a deposit or withdrawal at Exness the fastest you only need 24 hours for the funds to be received. These withdrawal times are faster than the industry average.
Powell
Jun 10 2023
Hey, when you're submitting your documents for verification, do they need to be translated into English? According to the article, there are a bunch of criteria that your documents must meet, like showing your full name, photo, and date of birth, and being officially issued by the government. But it doesn't specifically mention if translations are required. So, if you have documents in a language other than English, should you get them translated before uploading? It would be great to know if translations are necessary to make sure your documents meet all the requirements and make the verification process smoother.
Rangga
Feb 26 2024
According to the article, Exness offers a diverse selection of trading platforms, comprising MT4, MT5, MultiTerminal, MT4 Web-Terminal, and Mobile Platforms. This array of options grants traders the flexibility to access the market conveniently at any time. I find the mention of the MultiTerminal particularly interesting. While MT4 and MT5 are renowned and commonly utilized by traders, the specifics of Exness' MultiTerminal pique my curiosity. It would be beneficial to delve deeper into its features and functionalities to understand how it differs from the other platforms offered by Exness and how traders can leverage it to enhance their trading experience.
Helga
Feb 28 2024
Exness' MultiTerminal is a comprehensive trading platform designed to cater to the needs of traders who manage multiple accounts concurrently. This sophisticated tool offers a unified interface where users can oversee and execute trades across various accounts seamlessly.
Based on my experience, I can tell that one of the key advantages of the MultiTerminal is its ability to streamline account management tasks. Traders, especially professionals and fund managers, can efficiently monitor account activity, analyze performance metrics, and execute trades without the need to switch between different platforms or accounts. This consolidation of trading activities into a single interface not only saves time but also enhances productivity and accuracy in decision-making.